Quantcast
Channel: BatchPatch – The Ultimate Windows Update Tool
Viewing all 261 articles
Browse latest View live

Using the Job Queue to Execute an Ordered List of Actions on Target Computers

$
0
0

One of the most commonly used features in BatchPatch is the Job Queue. The Job Queue enables you to execute a series of actions, sequentially, on target hosts. Just about any action that BatchPatch can perform through manual execution can also be added to a job queue.

One of the most common reasons people use the job queue is to perform multiple update and reboot cycles on target computers– a kind of “lather, rinse, repeat” option for Windows Updates. Historically, Windows has sometimes behaved in such a way where after applying Windows updates and rebooting, subsequently doing a fresh scan for available updates would sometimes yield more updates to install. So it’s convenient to be able to automate the process whereby you can download and install updates, reboot, wait for the computer to come back online, then download and install updates, reboot, wait, and so on until no more updates are found. With the most recent versions of Windows (10/2019) we have not really seen this behavior occur as frequently as it once did with previous versions of Windows, but it’s still something that can happen, and it’s nice to be able to automate the “lather, rinse, repeat” process in order to save time and effort.

A Few Ways The Job Queue Can Help

Beyond doing an update and reboot cycle, there are many other reasons why one might want or need to be able to execute a series of actions, step by step, on a group of computers. For example, sometimes you might need to run a script or a command that disables a service or stops a process before or after you begin the normal Windows update and reboot process. In other cases you might need to pop a notification to the currently logged-on end user of the target computer before you proceed with any download or installation of updates. Or perhaps you need to install a third party application before or after the Windows update process completes. There are many reasons why using a job queue can be beneficial, so today I’m going to show you how to use it.

What About A Job Queue That Links Multiple Independent Systems Together Into A Larger Sequence?

Note, the BatchPatch Job Queue enables you to create a sequence of actions to run on a target computer or group of target computers. You can create a separate queue for each target, or you can execute the same queue on all targets. There is a lot of flexibility in what you can do, and even if you need to coordinate the actions of multiple different computers, such that one computer (or a group of computers) executes its job queue, and when it completes it triggers another computer (or group of computers) to execute its job queue, and so on… you can do that with the job queue too! However, note that to perform this kind of more complex queue you actually would use the Advanced Multi-Row Queue Sequence, which is a feature that works in conjunction with the standard job queue to effectively link different hosts together into one larger sequence, which can be very powerful for automation of many different tasks so that you can, for example, create a one-click process to execute updates and reboots on machines with interdependencies. And of course in BatchPatch you can also always schedule these job queues or advanced sequences to be executed at a specific datetime if you don’t want to manually launch them.

How To Create And Launch A Job Queue

  1. To create a job queue, select the desired rows in the grid, and then click on ‘Actions > Job queue > Create/modify job queue
  2. In the Job Queue window, create the desired queue. On the left side of the window you can select from available actions, and then either double-click or use the arrow button to add the selected item to the queue. The lower-left grid contains all of the custom commands, deployments, notifications etc that you have previously created and saved in BatchPatch.
  3. Select ‘Execute now’ to launch the queue on the highlighted hosts in the grid. Or if you want to save the queue to be executed at a later time, simply give it a title and click on the double-right-arrow button to save it. Queues that have been saved can be launched either from the Job Queue window or by simply selecting the saved queue from the Actions menu under ‘Actions > Job Queue > Execute saved job queues‘. Saved queues can also be launched via the Task Scheduler so that you don’t have to be there to kick them off.

Remotely Uninstalling Windows Updates

$
0
0

Let’s face it… even though we all wish Microsoft’s quality assurance and testing was better, it really seems to have gotten worse in recent years… significantly worse. There are a few primary ways that systems administrators can reduce the likelihood of encountering problems after installing Windows updates each month. First, have a testing lab setup with machines that largely resemble production computers, so that updates can be deployed into the testing environment before they are deployed to the production environment. If the testing environment’s computers are actually prepared with similar applications and services as production computers, then there is a good chance that the testing environment will reveal any major issues with Windows updates *before* those updates are ever deployed to production machines. However, it’s often difficult or even impossible to accurately configure testing servers to resemble the production servers closely enough to guarantee that update issues will be discovered in testing before they are deployed to production, so this isn’t the only step that should be taken. We also recommend designating certain production machines to be the first to receive updates, so that if any problems are identified, they can be addressed before deploying the same updates to an entire production network. Additionally, we think it’s important in most cases to *not* install updates within the first few days of their release. We believe that most organizations should be waiting at least a week after Patch Tuesday before they deploy new updates to production systems. This gives the rest of the world a chance to test the updates and report any problems, so that you can then decide if you need to postpone a maintenance window until Microsoft re-issues a fixed version of the update, or to perhaps do additional testing in your environment to confirm whether or not you might be affected by any problems that have been reported with the updates. However, while we do think that waiting a week or so is a great idea for most organizations, you shouldn’t wait too long, especially in cases where the updates to be installed are fixing critical issues that are actively being exploited in the wild. A balance will need to be struck, depending on the details, setup, and requirements of each particular environment, so that updates can be installed soon enough to protect computers while also waiting long enough to minimize any potential problems that might be encountered by installing a problematic update.

What happens if you install an update that is causing problems on your computers?

It’s going to depend on the nature of the problem, of course, because if the update is so destructive that computers won’t even boot, then you’re obviously going to have to manually address each affected computer in order to resolve the problems. However, in most cases when a problematic update has been deployed, simply uninstalling it is sufficient to make the problem go away until a fixed version of the update is published by Microsoft. If you find yourself in a situation where you need to remove a Windows update that you previously installed on numerous computers, you can use BatchPatch to execute the removal/uninstallation process.

Using BatchPatch to Execute the Update Removal/Uninstallation Command

First, note that there are two different commands built-in to BatchPatch for removing Windows updates. You’ll need to execute the command that corresponds to the particular operating system that you will be removing the update from. In BatchPatch you can see the two different menu items in the screenshot below:

  1. Highlight the rows in the grid for the computers that have the update installed that you want or need to remove/uninstall.
  2. Click on the relevant menu item, depending on which OS is installed on your target computers… either ‘Actions > Windows updates > Uninstall individual update (requires KB ID) – Windows 7/2008/2012‘ or ‘Actions > Windows updates > Uninstall individual update (requires KB ID) – Windows 10/2016/2019
  3. Enter the KB ID of the update that you want to remove, and tick or untick the ‘/norestart’ option, depending on whether you want the command to prevent the update process from rebooting the computer or not. If the computer needs to be rebooted in order to complete the update removal, and if you tick the ‘/norestart’ option, you’ll need to execute the reboot separately in order for the update removal process to be completed. We generally prefer to check ‘/norestart’ and then separately initiate the reboot in BatchPatch. In this way BatchPatch can monitor the reboot through its normal process. If the removal command itself performs the reboot (this happens if /norestart is un-ticked and the update removal process requires a reboot), BatchPatch won’t monitor it. Note, the command to execute is different, depending on which menu item you selected in the previous step. The screenshots below show the difference:
    wusa.exe /uninstall /KB:1234567 /quiet /norestart


    cmd.exe /c echo . | powershell.exe -ExecutionPolicy Bypass -command "$SearchUpdates = dism /online /get-packages | findstr 'Package_for'; $updates = $SearchUpdates.replace('Package Identity : ', '') | findstr 'KB1234567'; DISM.exe /Online /Remove-Package /PackageName:$updates /quiet /norestart"

  4. Lastly, click OK to execute the process.

Incorporating Custom Scripts in BatchPatch – Get Local Administrators Group Membership

$
0
0

Let’s have a look at how to incorporate a custom script into BatchPatch. In this case we’ll use BatchPatch to run a script that will retrieve the list of users who are members of the local administrators group on each target computer, and then optionally write it all to a text file.

If you would instead like to modify group members of a local group on target computers, or if you want a quick way to retrieve group membership on target computers without using a custom script and without being able to write the results to a file, take a look at this posting: Using BatchPatch to Modify Local Group Membership on Multiple Remote Computers

I’m not going to get into the details of the actual script that we’re going to use for this tutorial since this posting is not intended to be a scripting lesson but rather is meant to demonstrate one possible way to incorporate a custom script into BatchPatch. There are also other custom scripting examples on our website, if you’re interested, that you can find by searching ‘script’ in the search box on the upper right area of this page.

Here is the script:

Dim strFilePath, strComputer
strComputer = WScript.Arguments(0)
strFilepath = "C:\Temp\results.txt"
 
Sub GetAdministrators(strComputer)
    Dim objWMIService, strQuery, colItems, Path, strMembers
    Set objWMIService = GetObject("winmgmts:{impersonationLevel=impersonate}!\\.\root\cimv2")
    strQuery = "select * from Win32_GroupUser where GroupComponent = " & chr(34) & "Win32_Group.Domain='" & strComputer & "',Name='Administrators'" & Chr(34)
    Set ColItems = objWMIService.ExecQuery(strQuery)
    strMembers = ""
    For Each Path In ColItems
        Dim strMemberName, NamesArray, strDomainName, DomainNameArray
        NamesArray = Split(Path.PartComponent,",")
        strMemberName = Replace(Replace(NamesArray(1),Chr(34),""),"Name=","")
        DomainNameArray = Split(NamesArray(0),"=")
        strDomainName = Replace(DomainNameArray(1),Chr(34),"")
        If strDomainName <> strComputer Then
            strMemberName = strDomainName & "\" & strMemberName
        End If
	WScript.Echo strMemberName
        Set oFSO = CreateObject("Scripting.FileSystemObject")	
	If oFSO.FileExists(strFilepath) Then
	    oFSO.OpenTextFile(strFilepath,8).WriteLine(strComputer & ": " & strMemberName)
	Else 
	    oFSO.CreateTextFile(strFilepath).WriteLine(strComputer & ": " & strMemberName)
	End If
    Next
End Sub
 
GetAdministrators strComputer
  1. The first order of business is to copy the script text into notepad. Modify the filepath in the third line of the script to point to whatever location you want to use to save the results. Then save the script to somewhere on your computer as GetLocalAdmins.vbs
  2. If you only want to get the group membership and don’t care to log the results to a file, then you may delete or comment out the following section. In that case BatchPatch will just get the group membership so that you can view the result for each target computer inside the BatchPatch grid. However, if you really just want to get group membership without logging to a file, then you can use a simpler method that doesn’t involve incorporating a custom script. See the link provided near the top of this posting for details on that method. That said, if you are going to be using the script method that I’m demonstrating in this tutorial but you don’t want to log the results to a text file, then you should delete this section from the script:
    '
    'Set oFSO = CreateObject("Scripting.FileSystemObject")	
    'If oFSO.FileExists(strFilepath) Then
    '    oFSO.OpenTextFile(strFilepath,8).WriteLine(strComputer & ": " & strMemberName)
    'Else 
    '    oFSO.CreateTextFile(strFilepath).WriteLine(strComputer & ": " & strMemberName)
    'End If
    '
  3. If you want to run this script one-off to get group membership on a target, just copy and paste the following syntax, modifying the path as needed to match wherever you have the script stored, into a BatchPatch local command under ‘Actions > Execute local process/command > Create/modify local commands‘. Then after you have clicked OK to save the command, you’ll see that it appears in the menu. See screnshots below for reference:
    cscript "C:\SomeFolder\GetLocalAdmins.vbs" $computer

    IMPORTANT:
    There is a key element that we need to address. If you are going to use the script as-is and have it write the results from all target computers to a single file, you need to pay attention to thread synchronization issues. The specific problem here is that if you execute the script on numerous targets simultaneously, BatchPatch will launch a separate thread for each target, and each of those threads will try to write to the same text file at the same time. This is a problem that could result either in missing data or an error being thrown, so we need to set things up so that each row runs one at a time, sequentially, instead of having all rows run at the same time, simultaneously. This way only one BatchPatch thread at any given time will be accessing the text file and writing results to it. Note, if you have removed the section of code from the script that writes the results to a file, then you don’t need to worry about this issue at all.

  4. To resolve the threading issue we’re going to use the Basic Multi-Row Queue Sequence. This feature will enable us to force each BatchPatch row to execute sequentially, one at a time, until all rows have executed. First, select all rows in the grid and then click on ‘Actions > Job queue > Create/modify job queue
  5. In the Job Queue window, find the Local command that you created earlier in the lower left grid for ‘Saved User-Defined Commands and Deployments‘. The ‘Type’ will be shown as ‘Local’ with whatever title you gave to your command. Double-click it to add it as the only step in your job queue. Then click ‘Apply queue to row(s) without executing‘. See the following screenshots for reference:

  6. Now we’re ready to execute. With all rows selected, click on ‘Actions > Job Queue > Execute basic multi-row queue sequence‘ What this will do is instruct BatchPatch to launch the job queue in each row, one at a time, in the order that the rows were selected. As soon as one row finishes running the script and writing the results to the text file, the next row will commence, and so on until all rows have executed the script and written to the file. The results will also be displayed for each row in the ‘Local Command Output Log’ column.

Preventing Particular Updates from Installing on Target Computers

$
0
0

Under normal circumstances BatchPatch is used to initiate the download and/or installation of updates on a group of target computers. So long as you have setup your environment to work with BatchPatch as far as permissions and firewall settings are concerned, then BatchPatch can, if desired, be used without altering your existing Windows Update settings. That is to say that if you have your target computers configured to automatically install updates at a particular time each week, if you were to use BatchPatch at some other time in the week, BatchPatch would download/install updates at that time, assuming there were available updates to download/install at that time. However, most of the time when administrators are using BatchPatch, they want to use BatchPatch exclusively for the Windows update process, so they definitely do not want their computers to be automatically installing updates at other times. They essentially want to only ever have target computers download/install updates when they have initiated the process from within the BatchPatch console (either on-demand or via BatchPatch scheduled task). In this case, target computers must be configured to not automatically download/install updates on their own schedules.

Now, in BatchPatch it’s easy to choose to install only specific/particular updates, or to install certain categories of updates (such as ‘Security Updates’ or ‘Critical Updates’ etc), but how does one make sure that the target computers do not automatically install updates on their own at other times? And how does the administrator ensure that only the updates that he/she chooses to install via BatchPatch are the only updates that are installed on the target computers? There are a few things to consider. Let’s review them below.

First, if you’re going to be using BatchPatch as your primary method for initiating the update process on target computers, then it makes sense to start by telling target computers to *not* automatically install updates on their own schedules. There is a group policy object that you can enable on target computers that will instruct those computers to *not* download and *not* install updates on their own schedules. If you don’t know what group policy is, it’s essentially a mechanism that is built-in to Windows for controlling all sorts of settings for how Windows behaves in a domain environment. If your computers are not domain members but instead are running standalone or in a workgroup, you’ll still have access to all those same group policy settings, only instead of being able to control them from a single/central location in group policy (on the domain controller) you would instead control them individually on each target computer using the local policy editor. Local policy and group policy can be viewed as essentially the same things, except that group policy settings will control a group of computers, and is set on the domain controller for those member computers, whereas local policy settings are the same settings simply controlled and set on an individual per-machine basis.

The behavior of the following setting varies slightly depending on which operating system is running, but no matter which OS you are using you would want to open the group policy editor (or the local policy editor) and find the setting for ‘Configure Automatic Updates‘ which is available under ‘Computer Configuration > Administrative Templates > Windows Components > Windows Update‘. Setting the value to either ‘2 – Notify for download and notify for install’ or ‘3 – Auto download and notify for install’ will prevent updates from installing on their own. This way you can instead initiate the installation process from the central BatchPatch console. If you want BatchPatch to perform both the download and installation, then set the value to 2. If you want the computers to auto-download the updates on their own but then use BatchPatch for the installation portion of the process, then set the value to 3. In either case, once this is set, the computer will no longer install updates on its own automatic schedule.

OK, so if you configure your target computers, via group policy or local policy, to *not* ever automatically install updates on their own, then effectively speaking if you only use BatchPatch to initiate the installation of desired/selected updates, you’re going to end up with only the updates that you want installed on those target computers. In a certain sense I think it’s fair to say that you have then also prevented the particular updates from installing that you never opted to install. However, in this case if you had, for example, a list of 100 available updates, and you chose to install 90 of those 100 updates, then you would still be left with 10 available updates on the target computers. The act of *not* installing them but still leaving them there in the “available updates” queue is not identical, conceptually, to actually preventing them somehow from ever being installed. So… what if you want to actually prevent them from ever installing? To be clear, if you set things up in the way that I described above, those updates would never install unless you chose to install them through BatchPatch, but it’s conceivable that you could forget that you didn’t want to install them, and then maybe at one point you would inadvertently choose to install all of the available updates on target computers instead of only a limited subset of the available updates, thereby causing those 10 leftover updates to get installed. Maybe you would want to do everything in your power to prevent such a situation from being able to occur in the first place… What are your options for actually *preventing* those 10 updates from ever being installed? You have two basic options…

Hiding Updates on Target Computers

If you’re using BatchPatch standalone without any WSUS server involved, then you can use the ‘Hide Updates‘ feature in BatchPatch. What this action enables you to do is tell a target computer (or a group of target computers) to take an update (or group of updates) that is currently showing as available for installation, and to then effectively “hide” it so that it no longer even appears as available for the computer. In the example that I gave above with 100 updates, if you install 90 of them, you could then hide the remaining 10. Once hidden, if you were to then initiate a “check for available updates” or “download updates” or “install updates” action, the hidden updates would be excluded altogether, as if they never existed. This option is simple and quick to use, but it does come with one drawback, unfortunately. Let’s say that on January 1, 2020 Microsoft published update KB1234567. Then in the middle of January or at some point after that you decided to hide the update on the target computers so that it no longer appeared available. The problem is that Microsoft is capable of re-publishing that same update ID KB1234567 at a later date. If they do that, then KB1234567 will all of a sudden show up again in the list of available updates. However, note that just because Microsoft publishes the same update KB ID again in the future does not necessarily mean that the update is identical to what it was when you first hid it. In fact, it’s probably the case the update is definitely not the same as it was. So in a sense you could view it as Microsoft updating the update, so that the update itself functions better or behaves a bit differently or what have you, and in that case even though the update is being published under the same KB ID, in a certain sense it really wouldn’t be much different from Microsoft publishing the same update or ever-so-slightly different update under a different KB ID. The truth is that at any time Microsoft publishes a new update (or re-publishes and old update) the administrator should be evaluating from scratch if that update is one that he/she wants to install. So realistically the fact that Microsoft might sometimes re-publish a previously hidden update, such that the hidden update becomes unhidden and moved back to a status of “available” really shouldn’t be a major drawback for the administrator. It probably makes more sense for the administrator to simply view it as he/she would view a new update, and then simply decide if it is an update that he/she wants to install. If not, then it can just be hidden again.

Using a WSUS Server to Control Which Updates are Presented to Target Computers

The other option you have is to use WSUS to control which updates are ever even presented as “available” on target computers. In this case instead of using BatchPatch as a standalone tool, you would instead use BatchPatch in conjunction with WSUS. I should note that WSUS is free and simple to install and use, so it’s certainly a good option for many administrators. To see how to configure BatchPatch to work in conjunction with WSUS, check out this link: BatchPatch Integration with WSUS and Group Policy.

Once you have configured your target computers to work with the WSUS and BatchPatch, then instead of relying solely on BatchPatch to control which updates you install on target computers, you get an additional layer of control. Inside of WSUS you can configure it so that no updates are ever approved for distribution until you have gone into the console and selected them for approval. So, each month when Microsoft releases new updates, after your WSUS synchronizes with Microsoft’s public servers, you would then go to your WSUS and choose which of the available updates you would want to approve for distribution to your target computers. The target computers are configured to retrieve their updates from your WSUS instead of directly from Microsoft (as described previously), and this way the target computers only ever even know about the updates that you have first selected for approval on the WSUS. If you want to prevent a particular update from being able to be installed on the target computers, don’t ever approve it in the WSUS. In fact, you can actually use the “decline” option in WSUS so that not only is it not approved but actually it is officially declined for installation at that point. Target computers that are pointed at the WSUS (via Group Policy, as explained in the link above), will only ever “see” updates that have been approved. When you then use BatchPatch to download/install updates on those target computers, BatchPatch will only ever be able to install those approved updates… UNLESS you were to configure BatchPatch to bypass your WSUS and pull updates directly from Windows Update or Microsoft Update. If you wanted to do that, in BatchPatch you’d go to ‘Tools > Settings > Windows Update > Server Selection’, and then you would change the setting from ‘Default/managed’ to ‘Windows Update’ or ‘Microsoft Update’ instead.

Using the Job Queue to Clear ‘All Messages’ Before Executing a New Action

$
0
0

Some of our users launch a fresh instance of BatchPatch each time they use it, and they start with a brand new grid (or a set of grids) each time. They load their hosts and then begin patching. However, some of our users prefer to re-use the same grid file (.bps) over and over and over, so that each time they start patching, it’s really more like a continuation of the previous week or month. One downside to this approach is that the log data, particular in the ‘All Messages’ column, can become overwhelmingly large as it grows with each action that is executed. This is especially an issue for users who are automating virtually everything in BatchPatch. They often don’t even really want to interact with the application except to create new jobs, so at some point it makes sense to clear out the excess data that is no longer needed, but in such a way that requires no extra work from the administrator. To be clear, it’s not a lot of “work” by any means because it only takes a couple/few clicks, but for many sysadmins everything is all about automation. Today I’ll show you how to setup your scheduled tasks to execute a job queue, where the job queue’s first step is to clear column log data. The subsequent steps in the job queue can be whatever you need or want, but presumably they will involve actually patching the target computers or running scripts etc.

Create a Custom Command for Clearing Data in Desired Columns

  1. First let’s setup the selection list for which columns will be emptied. Click on ‘Actions > Clear column contents > Create/modify selections‘. You could choose to clear all columns (except for the Hosts column), or you could just selectively clear a couple/few columns. For this example let’s just setup an entry to clear only the ‘All Messages’ column. You can see in the screenshot below that I have selected the ‘All Messages’ column, and I have saved the entry by using the double-right-arrow button.
  2. With the entry you created above now saved, if you flip over to the Job Queue window (Actions > Job Queue > Create/modify job queue), you can see in the lower-left grid, titled ‘Saved User-Defined Commands and Deployments‘, that the entry you created a moment ago now appears.
  3. You can add that entry as the first step in a job queue. This way when the job queue is executed, the first thing it will do is clear out the ‘All Messages’ column. Then you can have it do whatever else you need or want, such as initiating Windows Update on target hosts. Then you can save the Job Queue by using the double-right arrow.
  4. With your job queue now created, you can setup a scheduled task for any target host that will execute the job queue. Click on ‘Actions > Task Scheduler > Create / modify scheduled task‘. In the Task Scheduler window, from the task drop-down menu, select the title of the Job Queue that you just created. Set a run date and time, and then click OK. Then make sure the scheduler is enabled by clicking the small red clock/timer icon in the upper right corner of the main BatchPatch window so that it turns from red to green.

BatchPatch – New Version Released in April 2020

$
0
0

At the end of last week we released a new version of BatchPatch. Today I’d like to go over some of the new features available, some of which we think are going to be popular with our users. For a complete list of of changes, click on ‘Help > Check for updates > View changelog‘ inside the software.

Deploying Windows 10 Feature Upgrades with the Standard BatchPatch Windows Update Actions

For those of you who have used this BatchPatch deployment method to apply Windows 10 feature updates, note that you can now use the standard/normal Windows update actions in BatchPatch to install these feature updates. If you perform a ‘Check for available updates‘ and have a Windows 10 feature update showing in the list of available updates, now instead of using the deployment method, you may simply tick the ‘Include “Upgrades”‘ classification filter in the BatchPatch settings form. Then when you use the standard BatchPatch Windows update actions either to “Download and install updates” or “Install downloaded updates” (if the feature update has already been downloaded), that feature update will be downloaded/installed in the same way that other updates are. Note, this capability only exists in BatchPatch’s default operating mode. It will not work in BatchPatch ‘cached mode.’ If you are running exclusively in ‘cached mode’ then you’ll still need to use the deployment method described at the link above.

Job Queue Looping and Branching with Labels and Goto

For a while now people have been requesting even more flexibility with the job queue. In particular, users have been asking about looping and branching, so that they can effectively have a higher degree of control over their queues. We didn’t want to release such functionality until/unless we could make sure it would fit in with BatchPatch’s existing functionality in such a way that would enhance it without making any features more difficult to utilize.

In the BatchPatch job queue you can now set labels and create ‘goto’ commands that enable simple looping and branching in a very easy-to-use way. For example, one of the things that users like to do is repeatedly check for available updates, install any that are presented, then reboot and repeat the process until there are no more available updates. Yes, it would be great if you could simply install updates and reboot one time and be done with it, but all patching administrators know that sometimes Windows makes things a bit more tricky by not presenting certain updates until other updates have been installed first and the computer has been rebooted. So, sometimes it’s helpful to be able to repeat the download/install/reboot process a few times in a row. In BatchPatch you could always accomplish this, but it required you to manually set the number of iterations. However, now with the new label/goto functionality, you can create a single loop to perform the desired steps. Here is one possible way to do it (note, there are definitely other ways to structure your job queue to accomplish something similar, so don’t feel locked into this particular example)

Loop to download and install updates plus reboot until no more updates are found:
1. label:YourCustomNameGoesHere
2. Download and install updates + reboot always
3. Wait 5 minutes
4. Wait for host to be detected online
5. Check for available updates
6. If most recent ‘Check for available updates’ found any updates, goto label:YourCustomNameGoesHere

You’re also now able to goto a particular label based on whether or not the previous action failed or succeeded, the target computer is in a ‘pending reboot’ state, the target computer is offline or online, a particular file or registry key/value exists, a particular file version is newer or older than some number etc. Additionally, inside the job queue you can now set the row color or disable the row.

Other / Miscellaneous

The new version contains various other improvements and bug fixes. If you encounter any issues or have a suggestion for a future build, you can reach us here.

Error 1605: Failed to create remote working directory. HRESULT -2147024829: The network name cannot be found.

$
0
0

Today I’d like to take a moment to talk about an error that I haven’t addressed specifically in the past but that does crop up sometimes. It can appear in any of the following ways, but each has the same cause/resolution:

Windows Update: Error 1605: Failed to create remote working directory.  Please check permissions on the target computer and verify your working directory path in Tools > Settings. HRESULT -2147024829: The network name cannot be found.
Windows Update: Error 1614: Failed to create remote working directory.  Please check permissions on the target computer and verify your working directory path in Tools > Settings. HRESULT -2147024829: The network name cannot be found.
Deployment: Error: Failed to create remote working directory.  Please check permissions on the target computer and verify your target working directory path in Actions > Deploy > Create/modify deployment: The network name cannot be found.

IMPORTANT: You might see 1605 or 1614 appear with a different HRESULT value and different error text. However, in this particular example we are specifically looking at HRESULT -2147024829: The network name cannot be found. Any other HRESULT value and error text would have a different cause and resolution.

Troubleshooting this issue is pretty straightforward, as there are generally only a couple/few reasons why it could be occurring.

  1. As suggested in the error text itself, the first thing you should do is check the ‘remote working directory‘ and ‘deployment directory‘ values under ‘Tools > Settings > Remote Execution > Remote Working Directory‘ and ‘Actions > Deploy > Create/modify deployment > Target working directory‘, respectively, depending on whether you are encountering the error while executing a remote command or a Windows Update action, or if you are encountering the error while executing a deployment. The default values that we recommend for these two fields are:
    Remote Working Directory: C:\Program Files\BatchPatch
    Deployment Target Working Directory: C:\Program Files\BatchPatch\deployment

    If either of these fields references a drive letter that does not exist on the target computer, the ‘network name cannot be found‘ error will occur. So, for example, make sure you don’t have your remote working directory set to Q:\Program Files\BatchPatch, unless the target computer actually has a Q: drive. If the drive letter itself exists, then BatchPatch will be able to create the directory/folder without issues (unless there is some other problem, such as a permissions issue, but that would manifest with a different error message).

  2. If you have verified that the target working directories are set to a valid drive letter and path, then the next thing to look at it DNS. Instead of entering the host name into BatchPatch, try the IP address. If the IP address works but the host name does not work, then you know you have some kind of name resolution problem on that system.
  3. If neither the host name or the IP address works without throwing the ‘network name cannot be found‘ error, then you’re probably looking at a firewall issue. Check the firewall on the target computer because it’s probably the culprit.
  4. If after all of the above steps you are still getting ‘The network name cannot be found‘ you could have an issue with your network connection. Are you able to ping the target computer either by name or by IP address? Are you able to browse directly to the target computer shares in explorer? You can try clicking on ‘start > run‘ and then typing ‘\\targetComputer\C$‘ without the quotes. Substitute the actual target computer’s name in place of targetComputer, and substitute the actual drive letter that your target working directory values are configured to use, if they are not configured to use the C: drive.

Hopefully this helps you get to the bottom of the issue and find the root cause.

Looping, Branching with Goto:Label in the BatchPatch Job Queue

$
0
0

The April 2020 release of BatchPatch has some new functionality in the job queue that we’re excited about. People have been asking for a while for more flexibility in the job queues, particularly to be able to create loops and have branching etc. We wanted the functionality to be as simple to use as possible while at the same time offering the most power and flexibility, and so we spent a lot of time working through the best way to incorporate these updates to meet those criteria. In the end we decided to use a combination of ‘Goto:Label’ with built-in ‘If/Then’ statements to accomplish that, and we’re happy with the results. Below I’ll give you some ideas of ways that you can use these new job queue entries. We have added the following entries to the ‘Special’ items list in the job queue:

'Insert label:X
'Goto label:X
'If previous action failed/errored (returned non-0), goto label:X
'If previous action was successful (returned 0), goto label:X
'If most recent 'Check for available updates' found 0 updates, goto label:X
'If most recent 'Check for available updates' found any updates, goto label:X
'If 'Get pending reboot status' returns FALSE, goto label:X
'If 'Get pending reboot status' returns TRUE, goto label:X
'If host is offline, goto label:X
'If host is online, goto label:X	
'If specified file exists, goto label:X'
'If specified file does not exist, goto label:X'
'If specified registry key exists, goto label:X'
'If specified registry key does not exist, goto label:X'
'If specified registry value exists, goto label:X'
'If specified registry value does not exist, goto label:X'
'If version of specified file is newer than Y, goto label:X'
'If version of specified file is older than Y, goto label:X'

Simple loop to update and reboot target computers until no more updates are found

1. label:YourCustomNameGoesHere
2. Download and install updates + reboot always
3. Wait 5 minutes
4. Wait for host to be detected online
5. Check for available updates
6. If most recent ‘Check for available updates’ found any updates, goto label:YourCustomNameGoesHere

Notify end users, hourly, to reboot, until the reboot has been completed

1. label:YourCustomNameGoesHere
2. Your custom notification message goes here, such as “Please reboot your computer as soon as possible.”
3. Wait 60 minutes
4. If ‘Get pending reboot status’ returns TRUE, goto label:YourCustomNameGoesHere

Execute a custom deployment only if a certain registry entry does not exist

1. If specified registry value does not exist, goto label:YourCustomNameGoesHere
2. Terminate queue
3. label:YourCustomNameGoesHere
4. Your custom deployment goes here, such as to install a particular piece of software


Windows Offline Update for Multiple Computers

$
0
0

You can use BatchPatch to apply Windows security updates to numerous computers that do not have internet access. Many organizations will have a high-security network where no computer on that network may access the internet. Further, it’s common to have the network so protected that it cannot even house a WSUS for update delivery. If you don’t have a WSUS and you don’t have internet access, how do you keep computers up to date? Below I’ll explain how you can use BatchPatch to fill the void.

On the one hand when you don’t allow the computers to access the internet, you increase their security by making it impossible to remotely access anything on the network, but on the other hand you make it harder to install updates, which is something you generally would want to do in order to improve security of the computers and close vulnerabilities in the operating systems. This is definitely a balancing act, but if you have a simple, straightforward method for applying updates to all of the offline computers, you’re going to be in much better shape than simply leaving the computers as-is, without ever updating them or with having to manually handle the update process on a periodic basis.

How does BatchPatch enable administrators to download and install security updates on an entire air-gapped / segregated network of computers?

BatchPatch actually provides a handful of different modes and methods for getting updates installed on offline computers. The method that you select will be primarily dependent on how strict the security rules and requirements are for the offline network. For example if the offline network is not completely air-gapped, and if you’re able and allowed to put BatchPatch on a computer that has both internet access as well as access to the computers on the offline network, then you’re going to select a different method than if the network is truly air-gapped or at least truly segregated such that no computer that has internet access can ever have direct access to computers on the network. However, even when you’re dealing with a completely segregated network, there might still be different levels of security required for that network. For example, in some cases you might be able and allowed to remove files from the offline network when needed, whereas in other cases the rules might be so strict that you are never allowed to remove anything from the offline network… or perhaps in some cases you are technically allowed to do such a thing, but the bureaucracy involved when it comes to change management processes is so burdensome that it’s barely ever worth actually trying to remove a file. BatchPatch provides different methods for each different scenario. There is always a balance between security and convenience, and BatchPatch attempts to provide the administrator with as much flexibility as possible to choose the least painful, most convenient method for any given offline network environment.

At the following page we go through all of the different scenarios, with detailed explanations. Each different scenario has a tutorial that explains how to download and install updates on your network, depending on the details and rules of your environment.

Cached Mode And Offline Windows Update

There are no applicable updates in the filtered collection

$
0
0

Sometimes we’ll get an email from someone who is confused about the message ‘There are no applicable updates in the filtered collection‘. They’ll note that when they execute ‘Check for available updates‘, BatchPatch finds updates, but when they execute ‘Download and install updates‘, BatchPatch reports There are no applicable updates in the filtered collection. Below I’ll explain why this happens, how to understand what is going on, and how to get past it.

When you perform a search for updates using ‘Check for available updates‘, BatchPatch utilizes the search preferences that you have configured under ‘Tools > Settings > Windows Update‘. You can see in the screenshot below that my search preferences are set to search for software updates (we generally recommend selecting ‘Important‘ and ‘Recommended‘ to emulate the search that the Windows Update Agent performs when searching for updates directly at the Windows Update control panel of a computer without using BatchPatch, but in this case I happened to have my setting on ‘Search for software updates‘ while I took screenshots for this blog posting).

You’ll also notice in the screenshot above that I have all ‘Update Classification Filtering‘ boxes unchecked. This creates a situation where even though BatchPatch finds updates when it searches for them, BatchPatch does not download or install any updates because the ‘Update Classification Filtering‘ checkboxes only apply to download and installation operations, while the ‘Search Preferences’ checkboxes apply to the search. When the ‘Download and install updates’ operation executes, instead of updates downloading and installing, BatchPatch displays There are no applicable updates in the filtered collection.

If we then look at the contents of the ‘Remote Agent Log‘ column we can see the details of exactly what occurred:

Six updates were found, but since all ‘Update Classification Filtering‘ boxes were unchecked in the settings, when BatchPatch applied the filters to the collection of updates that were found in the search, all updates were excluded. If you look at the section between “::Begin filtering collection” and “::End filtering collection” you can see that updates were “skipped” for the reasons shown, such as “Reason: UpdateClassification-Upgrades“, which indicates that the ‘Update Classification Filtering‘ box for “Include ‘Upgrades’” was not checked when the operation was executed.

There are other filters, in addition to the update classification filter, that could be the reason for you to find the filtered collection is empty when you attempt to download or install updates. The two other ways that updates get filtered are by date (see ‘Update Date Filtering‘ section of ‘Tools > Settings > Windows Update‘) and by including or excluding individual updates (see ‘Actions > Windows updates > Filter which available updates are included or excluding when downloading/installing‘). In all cases, when you see ‘There are no applicable updates in the filtered collection’ all you have to do is check the ‘Remote Agent Log’ data (either by viewing it directly in the ‘Remote Agent Log‘ column after a Windows Update action or by using ‘Actions > Windows updates > View BatchPatch.log‘ which will retrieve the BatchPatch.log file from the target computer’s remote working directory. This file will include the log data for every BatchPatch Windows Update action that you have ever launched (unless you have ever deleted the file or directory that contains it)). The log data detail will point you to the particular reason your filtered collection is empty, and then you can adjust your filters, as desired.

BatchPatch Remote Command Execution Options

$
0
0

BatchPatch has a number of commands and actions that are built-in and come with the software… Windows update commands, reboot and shutdown commands, wake on LAN, commands to get information from target computers about disk space usage, uptime, logged-on users, file version information, registry values, commands to review/modify services and processes, and a lot more. But what if you want to execute a command that isn’t already built-in? Obviously not all commands are going to be useful for all users, and we can’t include every command that ever existed in the history of all commands 🙂 
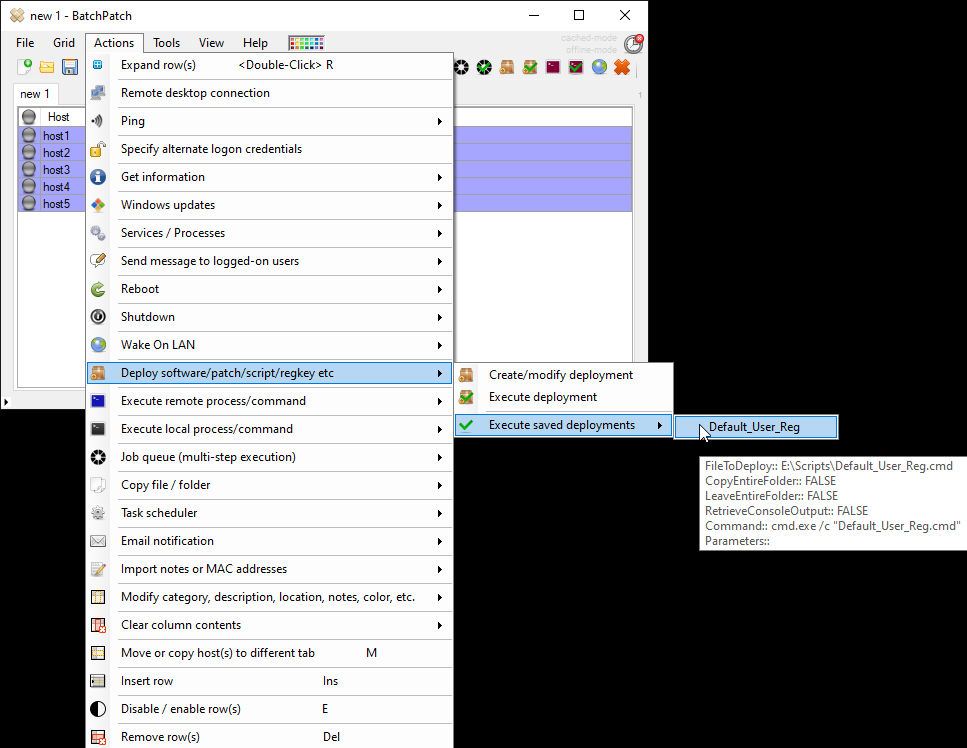
Inevitably you might find yourself wanting to hard-code some of your own commands into BatchPatch to execute on remote systems.

BatchPatch provides a few different places and ways to store and execute your own commands.

1. Under ‘Actions > Get information > Create/modify user-defined commands‘ BatchPatch provides and interface for you to add your own commands. Once a command is added in this interface, the command will appear in the BatchPatch menu under ‘Actions > Get information > Execute user-defined commands

2. Under ‘Actions > Execute remote process/command‘ there are several options. Remote command 1, 2, 3, 4 can be created and will be stored in the current grid and visible in the row under which they are created. Commands 1 and 2 do not attempt to capture output and will only report exit codes upon execution. Commands 3 and 4 attempt to capture output, so that you can display the output in the grid upon execution. Under the hood the logged-output commands (3/4) have to be executed differently from the standard commands (1/2), and in some cases this difference can cause failure, which is why we separate these completely. If a command fails to execute under 3/4 it might be successful under 1/2.

Additionally under ‘Actions > Execute remote process/command‘ we have ‘Create/modify remote commands‘ and ‘Create modify remote commands (logged output)‘ where you can create commands that won’t be tied to a particular grid and will instead be saved globally for all BatchPatch instances that you launch. Commands created under these interfaces appear hard-coded in the BatchPatch menu under ‘Actions > Execute remote process/command‘ as ‘Execute saved remote commands‘ and ‘Execute saved remote commands (logged output)‘, respectively.

More details on hard-coding custom commands into BatchPatch can be found here: How to Hard-Code Your Own Custom Commands in the BatchPatch Actions Menu


Once a command has been hard-coded into BatchPatch, not only is it available for direct execution on target computers, but now it can also be included in job queues or be executed by the Task Scheduler. You can see in the screenshot below that the Job Queue window shows all of my previously created hard-coded commands, deployments, copy jobs etc. I can add any of them to a job queue for automation.

Additionally, all job queues will appear along with all hard-coded commands, deployments, copy jobs etc in the Task Scheduler so that you can schedule any job queue or command that you have previously created.

Deploying Windows 10 Feature Update Version 2004 (the ‘May 2020 Update’) to Numerous Remote Computers Simultaneously

$
0
0

Beginning with the April 2020 release of BatchPatch, all Windows 10 feature updates/upgrades can be applied using the standard/normal Windows Update actions in BatchPatch (‘Actions > Windows updates > Download and install updates‘ or ‘Actions > Windows updates > Install downloaded updates‘). However, please note that for that to work, BatchPatch must be running in default/non-cached mode. If you are using cached mode you’ll have to either switch BatchPatch to non-cached mode OR you may follow the procedure outlined below to deploy the feature update to your target computers. If you are using a version of BatchPatch that was released prior to April 2020, then just follow the instructions below.

  1. Download (from Microsoft) the Windows 10 Media Creation Tool. Use this link to download the media creation tool directly from Microsoft. The media creation tool web page contains two options: ‘Update now’ and ‘Download tool now’. Do NOT click on ‘Update now’ because doing so would begin the update process on your computer. Since your goal is to deploy the upgrade to remote computers, instead please click on ‘Download tool now’ to save the tool to your computer. Important: When you run the media creation tool per the next step, you will not have a choice to select which Windows 10 version is used to create the media. This means that if Microsoft releases a new version of Windows 10 when you follow this tutorial, you’ll end up with that version as opposed to the specific version 1909 that is available today at the time of this writing. If you have another channel for obtaining media for a particular Windows 10 version, such as with a Microsoft volume licensing agreement, you may use that instead of obtaining the media through the steps outlined in this tutorial.
  2. Open the Windows 10 Media Creation Tool that you saved to your computer a moment ago. IMPORTANT: It is NOT sufficient to run the tool as administrator from an account that is logged on without admin privileges. For whatever reason, you must actually be logged on to the computer with an account that is a member of the local administrators group. Otherwise the tool will not allow you to run it to completion. We have no idea why Microsoft made the tool work this way, but it’s what they did. So go ahead and log on to your computer as a local administrator, and then launch the tool and follow the rest of this tutorial.
  3. Create installation media with the Windows 10 Media Creation tool. When the tool is running you’ll have to choose between two options to either ‘Upgrade this PC now’ or ‘Create installation media (USB flash drive, DVD, or ISO file) for another PC. Since you are following this tutorial with the intention of learning how to to use BatchPatch to update other PCs, choose the option to ‘Create installation media…’ and then click ‘Next’.
  4. Choose your language / edition / architecture, and then click ‘Next’.
  5. Choose the media type. For the sake of this tutorial please select ISO as the type of media. After clicking the ‘Next’ button you will be prompted to choose a location on your computer to store the ISO file that will be downloaded/created. Select a directory/location to store the file, and then do something else until the download finishes. Depending on your connection speed it could take a little while because it’s in the range of 4GB.
  6. Extract the ISO contents to a location on your local disk. After the download in the previous step is complete you’ll have to locate the file on disk and then extract the contents of the ISO to another folder. I like to use the free 7-zip for this process, but you may use whichever tool you prefer: 7-zip. After the ISO has been extracted you’ll have all of the installation files for the feature update in a single folder.
  7. Configure a deployment in BatchPatch. In BatchPatch click on Actions > Deploy > Create/modify. In the window that pops up for the Deployment configuration, click on the ‘…’ button to browse to the location where your ISO contents have been extracted to, and then choose the ‘setup.exe’ file as the file to deploy. Make sure to check the boxes for ‘Copy entire directoryandLeave entire directory. After the initial deployment phase is complete, the target Windows operating system will end up rebooting itself at least once but usually more than once while it completes the setup and installation for the feature update. As the process runs it needs to have access to all of the files that BatchPatch will deploy. Having both of the aforementioned boxes checked will ensure that when the upgrade process runs on the target computer that it has all of the files it needs for the installation. After the feature update has completed 100% you may delete the files from the target computer(s). However, please make absolutely sure that the upgrade process is 100% completed before you delete any files. In your BatchPatch deployment configuration screen you will also need to add the following parameters:
    /auto upgrade /quiet

  8. Execute the feature upgrade deployment. In the deployment configuration that you created in the in the previous step you can execute the deployment immediately for the currently selected rows in the grid by just clicking on the ‘Execute now’ button. Alternatively you may save the deployment for future usage by clicking the double-right-arrow button ‘>>’. If you choose to save the deployment instead of executing it immediately, then when you are ready to deploy the feature update to your remote computers, you can begin the process by selecting those computers in the BatchPatch grid and then clicking on Actions > Deploy > Execute deployment, and then choose the deployment that you just created/saved.

    You should expect that the entire process will take a bit of time to complete. BatchPatch has to copy the whole installation directory to the target computer(s), which contains several gigabytes, before it can execute the upgrade process on the target(s). IMPORTANT: After the BatchPatch deployment completes for a given target computer BatchPatch will show Exit Code: 0 (SUCCESS). However, this just means that the BatchPatch deployment component is finished. The Windows feature update/upgrade process will take additional time. Please be patient and let the target computer continue upgrading and rebooting as many times as is needed. It might take a little while with multiple automatic reboots before everything is 100% finished.

    NOTE: We have had a couple of reports from users who received the following error:

    Deployment: Error: Access to the path '\\TargetComputer\C$\Program Files\BatchPatch\deployment\autorun.inf' is denied.

    We don’t know the exact cause of this issue, but it seems likely to somehow be related to the way that permissions were applied or inherited during the ISO extraction process. If you encounter this error it can be resolved quickly and easily by just deleting the autorun.inf file from the source directory after extracting the ISO contents but before executing the actual deployment for any target computers. This will prevent the problematic file from ever being copied to target computers. As such, the error will not occur.

Deploying a Registry Key / Value to HKEY_CURRENT_USER (HKCU) – Part 2

$
0
0

Last year I posted this tutorial about how you can deploy a registry key/value to the HKEY_CURRENT_USER (HKCU) registry hive of target computers. Following those instructions will enable you to place a registry key/value into the registry hive of all users who have logged on to the target computers. However, what if you want to deploy a registry key/value to target computers that will appear in the registry hive for users who have not yet ever logged on to the target computers? Is that possible? It sure is!

To deploy a registry key to HKCU for users who have not even logged on to the computer yet, you have to modify the *default* user profile. Windows uses a default profile as a template to create the profile for new users who log on to the computer. If you can successfully modify the default user profile to contain the changes that you want, then when a new user logs on to the computer for the first time, his/her profile will be created based on that default profile, which will include the modifications that you previously made to the default profile. So in this case what we have to do is load the registry for the default user profile on all target computers that we desire the modification to exist, then add our desired registry key/value to it, and then unload it. Pretty simple, actually. The process works like this: We’ll start by creating a batch file on the BatchPatch computer. This batch file is what will actually perform the work. We will use BatchPatch to deploy it to all of the desired target computers. BatchPatch will copy the batch file to each target computer and then execute it, effectively modifying the default user profile on all target computers.

Before we get started, if you have not already done so, please review this link, which explains the relationship between HKCU and HKU. It’s important to understand that HKCU is actually just a view into HKU for a specific user’s registry, which is explained at the aforementioned link.

  1. Create the batch file. To do this simply open notepad or your favorite text editor, add the following lines, and then save the file with a .bat or .cmd extension. I have called my batch file “Default_User_Reg.cmd”
    REG LOAD "HKU\temphive" C:\users\default\ntuser.dat
    REG ADD "HKU\temphive\Software\TestKey" /v TestValue /t REG_DWORD /d 1
    REG UNLOAD "HKU\temphive"

    IMPORTANT: For your file, you’ll need to modify the second line to reflect the registry key/value that you want to create.

    As you can see, the second line in the script above is:

    REG ADD "HKU\temphive\Software\TestKey" /v TestValue /t REG_DWORD /d 1

    This will have the affect of creating a DWORD called TestValue with a value of 1 inside the HKCU\Software\TestKey of the computer that the batch file is deployed to.

    You’ll notice the script lines use HKU, not HKCU, so what’s happening here?

    Line 1 of the script loads the ntuser.dat file for the default user temporarily into the registry. The temporary location where we will be able to access the ntuser.dat registry will be HKU\temphive. Have a look at the screenshot below. You can see here what the registry looks like if you were to just run the “REG LOAD” command on its own. Notice how under HKEY_USERS we get a new “temphive” key. This “temphive” key is the HKCU hive for the default user profile, which is stored in the ntuser.dat file that we find in C:\users\default\ntuser.dat. If you have any questions about the syntax for REG ADD review this link from Microsoft.

  2. Once you have created your batch file, you’ll need to create a deployment in BatchPatch. Select ‘Actions > Deploy > Create / modify’, and make your deployment configuration look like mine in the screenshot below, optionally saving it with the double-right-arrow button, if desired:

  3. Now you’re ready to execute the deployment. Select all the desired rows in the grid, and then click on the ‘Execute’ button in your deployment window. Or if you have saved the deployment, then go ahead and execute it by selecting the menu item ‘Actions > Deploy > Execute saved deployments > Default_User_Reg

  4. If you want to check that the registry key/value has been properly added, go back to one of the computers where the script was deployed, and then run *just* the REG LOAD command in an administrator/elevated cmd prompt. Then launch REGEDIT to check for your changes. When your’re done, close REGEDIT, and then run the REG UNLOAD command to unload the ntuser.dat. The next time a brand new user account is logged on to the computer, it will already have the registry key/value.

Applying Windows Updates to a Large Group of Computers En Masse

$
0
0

Many environments will be ready to use BatchPatch without any special or additional configuration required, but some might require a few tweaks in order for everything to work properly. If it’s the first time you’ve used BatchPatch, check out the ‘Getting Started‘ guide to learn how to configure your computers and network for BatchPatch.

Once you have everything configured properly, it’s shockingly easy to download and install updates on a large group of computers, en masse. It doesn’t matter if you’re using your own local WSUS server or if you’re using Windows Update or Microsoft Update. BatchPatch can work with all three. If you’re using a local WSUS, then your target computers are already going to be configured by Group Policy to point to the WSUS. When this is the case, BatchPatch should be configured under ‘Tools > Settings > Windows Update > Server Selection’ to use ‘Default/Managed’ like in the screenshot below.

If you want to override the GPO and use Windows Update or Microsoft Update instead, then just select the desired option. For ‘Search Preferences’ we recommend that WSUS users select ‘Search for software updates’ AND ‘Search for driver updates’, and then tick every box under ‘Update Classification Filtering’ (except for “Upgrades”). This allows BatchPatch to find and download/install every possible update, which means that so long as an update is approved in your WSUS, BatchPatch will be able to find/download/install it. For people who are *not* using WSUS, we generally recommend selecing ‘Important’ AND ‘Recommended’ in the ‘Search Preferences’. Then tick every box on the left side of the ‘Update Classification Filtering’ settings. This will effectively enable BatchPatch to find/download/install the updates that Microsoft thinks you should have.

After your settings have been configured, the process is very straightforward to apply updates to numerous computers all at one time.

  1. Load the desired target hosts into your BatchPatch grid:Click on ‘Grid > Add hosts’ (or use one of the other options in that menu for importing hosts into the grid), and then add the desired hosts.
  2. Start the download and/or install process:Highlight the desired hosts, then select ‘Actions > Windows updates > Download and install updates + reboot if required’ to begin the download and installation process. If you want to first check to see which updates are available and would be downloaded/installed, use the ‘Check for available updates’ option or the ‘Generate consolidated report of available updates’ option.
  3. Monitor to completion:Once the process has begun you can pretty much sit back and watch everything happen. You’ll be able to see the status of download and installation for each target computer in the grid. As each target computer completes its update installation, BatchPatch will initiate a reboot (unless none of the installed updates require a reboot to complete) and automatically start pinging the target. You’ll be able to see the ‘LED’ status orb icon for each row (left-most column) change color as the host goes offline and comes back online, giving a very clear picture of the state of each host.

Windows Patch Management Software

$
0
0

The Ultimate Windows Update Tool

BatchPatch is the “Ultimate Windows Update Tool” for a reason. It’s inexpensive, it’s very easy and intuitive to use, and it “just works” when it comes to updating Windows. It can be used to apply standard Windows Updates in addition to managing patch deployments and software updates for third-party applications.

BatchPatch Animation

A Tool Designed for Systems Administrators

Systems administrators love BatchPatch because it was designed specifically for them, with a simple, straightforward interface that works in a way that “just makes sense” to people who work with computers for a living. A wise sysadmin once compared BatchPatch to a fighter jet, whereas some other Windows patch management applications can seem more like an aircraft carrier. We think the analogy is a pretty fair assessment. Some patch management software products can be extremely complicated and expensive to operate. They are slow moving and hard to steer. Their setup typically involves numerous servers with lots of moving parts, which can not only cost a lot of money but can also be a massive time sink for the administrators. They’re bloated, difficult to operate, and frustrating to troubleshoot. While it’s true that they will often offer a ton of different features, in many environments they are just way too much to deal with, especially when only a small subset of the features are typically even utilized. BatchPatch, on the other hand, is able to just swoop in rapidly with high maneuverability to hit the needed targets, and then get out quickly. The patching is completely done practically before it even started. We have many customers who have either completely switched to BatchPatch from these behemoth applications, or who have added BatchPatch as a supplementary tool for those times when they simply need to “get it done” without wasting hours struggling with their standard patch management tool.

Free Evaluation

If you’re new to BatchPatch, please download the free evaluation version so that you can test the software for yourself. In many environments it will “just work” right out of the box with zero configuration required. In those cases you can literally download the app, launch it, and start patching within seconds. In some environments BatchPatch will require a minimal amount of configuration to setup the proper permissions and firewall rules to get going. Have a look at the ‘Getting Started‘ page for details on how to setup your environment to work with BatchPatch.

Instructional Materials and Tutorials

We have numerous tutorials and instructional materials posted here, that will help you get the most out of BatchPatch, whether you just want to apply Windows Update to numerous computers, or if you need to deploy 3rd-party software to your entire network, or even if you need to orchestrate a complex sequence where target servers are patched and rebooted in a specific order, with scripts executed before and after patching, and with detailed requirements for which machines are offline at any given time.

Help and Troubleshooting

If you encounter any problems, have a look at these troubleshooting pages:
Troubleshooting Common Errors in BatchPatch
BatchPatch Troubleshooting Guide

Forums

You may also search the forums for help, or post a question there if you can’t find the answer you’re looking for.

Contact us

And of course you may also reach out to us directly with any questions or concerns.


Reset Windows Update with a Single BatchPatch Remote Command

$
0
0

We recently received a request to integrate the following into BatchPatch, so that with a single click a user could perform the following actions on numerous target computers:

  1. Stop the Windows Update service by running the following command:
    NET STOP WUAUSERV
  2. Rename the C:\Windows\SoftwareDistribution folder to C:\Windows\SoftwareDistribution.old
  3. Start the Windows Update service by running the following command:
    NET START WUAUSERV

Currently there is not a built-in macro in BatchPatch for the above items, but the good news is that it’s easy to create your own one-click method to perform the tasks.

Before I explain how to easily incorporate this macro into your own BatchPatch instance, let’s briefly discuss the impact and implications of performing these actions. Essentially, it’s only step 2 that really *does* anything destructive, but you can’t perform step 2 without first stopping the Windows Update service. So, step 1 stops the Windows Update service, step 2 renames the SoftwareDistribution folder to SoftwareDistribution.old, and then step 3 restarts the Windows Update service. When it starts, Windows will automatically recognize that there is no longer a SoftwareDistribution folder in C:\Windows, thereby forcing it to actually create a new one from scratch.

Windows stores downloaded updates in the SoftwareDistribution folder along with a database that retains history information about updates that have previously been installed. If you have downloaded Windows updates but have not yet installed them, they will be stored in this folder until they are installed. However, if you then delete the contents of the folder or rename the folder, thereby forcing Windows to create a new folder from scratch, your downloaded but not yet installed updates will be deleted, requiring you to download them again from scratch before you can install them. Additionally, much of the Windows Update history information that Windows retains about updates that have previously been installed is stored in a database that is housed in this folder. If the folder has been renamed or deleted, you may no longer be able to determine when a particular update was previously installed. In Windows 10 it has already become increasingly difficult, or in some cases impossible, to determine when old updates were installed, because each time you install a feature update, most of this update history information is wiped since most feature update installations are treated by Windows like a complete operating system upgrade / reinstall. That said, the loss of history information that occurs when the SoftwareDistribution folder is renamed or deleted may not be such a big deal to you since you’re probably going to lose some of that information at some point in the future anyway (if you’re running Windows 10).

Many forums on the web will describe the process of renaming or deleting the SoftwareDistribution folder as a good way to reset the Windows Update components. We have even occasionally suggested it in our forums. Before you go about doing this, you should make sure you really want to do it. It will certainly fix certain issues at certain times, but I wouldn’t recommend using it as a “first-try” option. Usually this process should be reserved for a last resort attempt at fixing your issue. Also note, it generally always makes more sense to rename the folder as opposed to delete it altogether because if on the off chance it creates a problem, you can always revert back to the renamed folder, if need be. If it works without issues to solve your problem, then you can certainly just move forward and delete the old folder that you had renamed so that it’s no longer taking up space on your hard drive.

OK, so to perform the above operations as a single-click task in BatchPatch, you’ll need to do the following:

  1. Select ‘Actions > Execute remote process/command > Create/modify remote commands’
  2. In the window that appears, click ‘Add Row’ and then enter the following syntax into the ‘Command’ field (you can use any title that you like in the ‘Title’ field):
    NET STOP wuauserv & MOVE C:\Windows\SoftwareDistribution C:\Windows\SoftwareDistribution.old & NET START wuauserv

  3. That’s it! Now when you are ready to execute the task on target computers, simply highlight the desired rows in the BatchPatch grid, then select ‘Actions > Execute remote process/command > Execute saved remote commands’. Find your command in the menu and click on it to execute it on the selected target hosts.

Error retrieving service instance data: The maximum message size quota for incoming messages has been exceeded.

$
0
0

Today I’d like to discuss an uncommon error that can occur when trying to launch selected .bps files that are active in the BatchPatch service instance. First, if you’re not sure what the BatchPatch service instance is, you might not be running BatchPatch as a service. This error can and will only occur when a grid is already running in the BatchPatch service instance, and then you try to view the contents of that grid. Running BatchPatch as a service is something that users can do if/when they want to be able to have BatchPatch run and execute scheduled tasks without needing to be logged-on to a computer with BatchPatch actively open and running. The service instance enables BatchPatch to run as a service, in the background, even when no one is logged-on to the computer. To learn more about running BatchPatch as a service, please review this page: Running BatchPatch as a Service

The error shown below that I want to address is:

Error retrieving service instance data: The maximum message size quota for incoming messages has been exceeded. To increase the quota, use the MaxReceivedMessageSize property on the appropriate binding element

When BatchPatch is running as a service, the main BatchPatch instance (the one you see when you manually launch BatchPatch) communicates programmatically with the (hidden/invisible) BatchPatch service instance. When you view grids that are currently active/running inside the service instance, the main BatchPatch instance queries the BatchPatch service instance to retrieve the data that it then displays in the service instance grid viewer, as illustrated in the screenshot below.

When the main BatchPatch instance queries the BatchPatch service instance for grid data, the BatchPatch service instance then packages and compresses the data to send to main BatchPatch instance. If this compressed grid data is not smaller than the MaxReceivedMessageSize property, then the above-mentioned error message is generated. At the time of this writing, the BatchPatch MaxReceivedMessageSize is set to 2000000. This value is *not* user-configurable at the time of this writing, though we may expose this is as a user-configurable setting in a future version. In practice, 2000000 is plenty large enough to accommodate the very large majority of grids. However, if your actual .bps file grid data starts approaching 20MB (or greater), you might encounter the above-mentioned error. Even in the absence of this error message, a 20MB .bps grid file is still very large and should be cleaned up to make smaller.

Reducing the size of a BatchPatch .bps grid file

To check how large your .bps grid file is, simply browse to the location of the .bps file in Windows Explorer, and then right-click on the file and select ‘Properties.’ You can see in the screenshot below that my .bps file is only 24.4KB. If you are seeing the above-mentioned error message, then your .bps file is probably at least 15MB-20MB in size.

To reduce the size of your .bps file you have a few different options:

  1. Find where the bulk of the data in the .bps file is, and then remove/purge that data. Usually if you have a very large .bps file, the bulk of the data is going to be in the ‘All Messages’ column. You can selectively and simply purge this data by selecting the desired rows in the grid, and then clicking on ‘Actions > Clear column contents’ as described here: Clearing Column and Grid Contents in BatchPatch. If you are using BatchPatch job queues, you can even add a step to your queues that will execute a ‘Clear column contents’ operation for you.
  2. If you don’t want to clear the column contents in your existing .bps file, you may simply archive your existing .bps file, and then start a new one from scratch.
  3. Alternatively, you might prefer to split up your existing .bps file into multiple .bps files, which you can do by moving hosts from one grid to another. To do this, select the desired hosts to be moved, and then click on ‘Actions > Move or copy host(s) to different tab‘, and then make sure to select the option to ‘Move entire rows‘.

The post Error retrieving service instance data: The maximum message size quota for incoming messages has been exceeded. first appeared on BatchPatch - The Ultimate Windows Update Tool.

Deploying .msi, .msu, and .msp Files Remotely to Numerous Computers

$
0
0

You can use BatchPatch to deploy virtually any type of file or package to target computers. As Windows systems administrators, we commonly have to work with .msi and .msu files, and occasionally we need to deal .msp files too. If you have a .msi, .msu, or .msp file that you need to install on numerous computers, consider using BatchPatch to perform the task. Instead of manually logging on to each target computer, you can quickly and painlessly create the deployment in BatchPatch for distribution to any number of remote computers.

Creating a BatchPatch Deployment

The process for creating a deployment for any of the aforementioned file types (.msi, .msu, .msp) is essentially the same.

  1. In BatchPatch click on ‘Actions > Deploy software/patch/script/regkey etc > Create/modify deployment
  2. In the Deployment window that appears, give the deployment a title, and then in the ‘Exe, msi, cmd, etc:‘ field, browse to the file you want to deploy, or manually type the path into the field. In this example you can see that I am deploying E:\temp\Special.msi. Note, if the package that you are deploying is not a standalone package but rather is one of numerous files required for the installation, then put all of the files into the same directory, and then also tick the box to ‘Copy entire directory‘. Generally, for .msi, .msu, and .msp files, they will be standalone, but if you are using ‘Copy entire directory‘ just make sure that *only* the files that are required for the deployment are included inside the directory that will be copied. This is because any/all files in that directory will be copied to each target computer where the deployment is executed, so you’ll want to ensure that only the needed files are copied, otherwise the deployment will take longer to execute, and you could even potentially end up with a disk space issue on target computers if you have very large unneeded files in the directory that is being copied.
  3. You can save the deployment by simply clicking on the double-right-arrow button. Once saved, you’ll see it appear in the list of ‘Saved Deployments’ on the right-hand side of the Deployment window. You have a couple of options for actually executing your deployment.
  4. Executing a BatchPatch Deployment

  5. If you click the ‘Execute now‘ button inside of the Deployment window, BatchPatch will immediately launch the deployment for any rows that are currently selected/highlighted in the grid. However, if you are not ready to execute yet, you can just close the Deployment window until you’re ready. Then when you’re ready, go ahead and select/highlight the desired target computers in your BatchPatch grid, and then click on ‘Actions > Deploy software/patch/script/regkey etc > Execute saved deployments > My Special.msi deployment

The post Deploying .msi, .msu, and .msp Files Remotely to Numerous Computers first appeared on BatchPatch - The Ultimate Windows Update Tool.

Verifying the Authenticity and Integrity of BatchPatch.exe

$
0
0

Sometimes we are asked why we don’t have a listing of file hashes next to the download link on our website. We definitely understand why it’s important for users to verify the integrity of a file that they download from us. We don’t want you to use a file that has been modified or tampered with, and you certainly should not open such a file on your computer. For this reason, we always digitally sign the BatchPatch.exe. A digital signature enables the end-user to confirm that a file was both published by the intended/expected source (in this case by us, Cocobolo Software, LLC) and also has not been modified, altered, or tampered with after being published or while being downloaded. A file hash on its own does not provide any any assurance that the file was published by the intended/expected source, so it is inferior to a digital signature. For example, imagine a scenario where a website is hacked. The hacker then does two things: She replaces the downloadable file on the website with her own a malicious file, and then she also replaces the file hash next to the download link to match that of the malicious file. If an end-user then comes along to download the file, he might think he is downloading a safe file because the file hash posted on the website matches the actual hash of the file after being downloaded. But little does he realize that he has downloaded a malicious file. So, for this reason, we don’t post file hashes. We do always digitally sign our BatchPatch.exe.

To verify that the BatchPatch.exe that you download from us is authentic and has not been modified or tampered with, we recommend that you check the digital signature on the BatchPatch.exe before you launch it. In this case, by verifying the digital signature on BatchPatch.exe you can be assured that the file you have is the file that we published, and that it has not been modified in between the time that we published it and the time that you obtained it. If the BatchPatch.exe does *not* have a digital signature at all OR if it has a digital signature that is *not* signed by us, Cocobolo Software, LLC, then you’ll know that the file you obtained is *not* the file that we published.

How to Check the Digital Signature on BatchPatch.exe

  1. In Windows Explorer, right-click on the BatchPatch.exe file that you obtained from us and click ‘Properties’ in the drop-down menu that appears. In the ‘BatchPatch.exe Properties’ dialog, first make sure that you see a ‘Digital Signatures’ tab. If there is no ‘Digital Signatures’ tab then it means the file is not signed. If the file is not signed, do not open it on your computer.
  2. Next, take note of who the signer is. In the screenshot above you can see the signer is us, Cocobolo Software, LLC. If you double-click on the row, or highlight the row and click ‘Details’, you can further examine the certificate, if desired.

The post Verifying the Authenticity and Integrity of BatchPatch.exe first appeared on BatchPatch - The Ultimate Windows Update Tool.

BatchPatch – New Release 2020-09-25

$
0
0

We published a new build at the end of last week. Here are the highlights:

Search for Updates with Filters Applied – Menu and Job Queue Items:

We added the following Windows Update action menu items:

*Check for available updates (with filters applied)
*Generate consolidated report of available updates (with filters applied)
*Retrieve consolidated url list of available updates (with filters applied)

Previously a search for updates would find all available updates, based on the search settings. However, this wasn’t super helpful if you wanted to know which updates were applicable to target computers *after* the download/install filters had been applied. Now with these new menu items you have the ability to perform a search for updates with the filters applied so that you can preview exactly which updates will be applied when the actual download and installation takes place.

Similarly, we also added the following items to the job queue:

*Check for available updates (with filters applied)
*If most recent ‘Check for available updates (with filters applied)’ found 0 updates, terminate queue
*If most recent ‘Check for available updates (with filters applied)’ found 0 updates, send email notification
*If most recent ‘Check for available updates (with filters applied)’ found 0 updates, goto label:X
*If most recent ‘Check for available updates (with filters applied)’ found any updates, goto label:X

These new job queue items will enable you to tweak your loops/branches/gotos to take into account the post-filter available updates list instead of just the pre-filter list.

Customization of User-Defined Entry Visibility and Order in Menus

All user-defined entries in the software can now be hidden from the menus, so you can customize which commands/deployments/queues etc that you want to be visible in the main menus without having to delete commands altogether in order to hide them. If you look at the screenshot below you can see that I have only checked the box next to the first two remote commands in my list. As a result of doing that, only those two commands appear in the ‘Execute saved remote commands‘ menu item. In addition to remote commands you can do the same for job queues, deployments, messages to logged-on users, copy jobs, and local commands. Additionally, you are now able to change the order of how the visible entries appear in the menus.

Confirmation Dialog Windows Now Always Fit Contents

If you are executing a job queue with numerous steps, you’ll now always be able to see the entire set of steps appear in the confirmation dialog that appears before final execution. The confirmation dialog windows throughout the app now have a scrollbar, which will be visible only if needed, so that you can now view the entire dialog contents, even in cases where the text would have been truncated in previous versions. Additionally, the confirmation dialog windows are now also resizable. In a future version we may add the ability for the window settings to be customizable by users, but for now, the good news is that you won’t have to guess at the contents anymore if you are about to execute a job queue with a lot of steps.

Bug Fixes and Miscellaneous

As always, there were a number of bugs that we fixed. Additionally we made various other minor improvements and updates throughout the code; some visible and most invisible.

The post BatchPatch - New Release 2020-09-25 first appeared on BatchPatch - The Ultimate Windows Update Tool.

Viewing all 261 articles
Browse latest View live