Quantcast
Channel: BatchPatch – The Ultimate Windows Update Tool
Viewing all 261 articles
Browse latest View live

Using BatchPatch In ‘Offline Mode’ When BatchPatch Does *Not* Have Internet Access

$
0
0

When ‘cached mode’ is enabled, the computer that is running BatchPatch will download updates for all target computers directly to its local cache directory. Target computers will not individually download their own updates from Microsoft or a WSUS. Instead BatchPatch will distribute updates to target computers from its cache. ‘Cached mode’ can also be used in conjunction with ‘offline mode’, which enables an administrator to apply Windows Updates to computers that don’t have internet access or access to a managed update server such as WSUS.

This tutorial demonstrates how to use BatchPatch in ‘offline mode’ to download and install updates on multiple computers attached to a network that does not have any internet access. In this tutorial, the computer that runs BatchPatch will instruct all target computers to perform an offline search for updates against the offline scan file that Microsoft publishes monthly. The list of available updates from each target computer is transferred back to the BatchPatch computer to be saved as a .bpurl file. The .bpurl file is then manually transferred by the administrator to a computer that has internet access, where it can then be used to download all of the updates to a local repository. The repository is then manually transferred by the administrator back to the offline network. From there BatchPatch is able to distribute the updates to target computers and initiate the installation process. In this way all of the computers attached to the offline network can be updated very easily with minimal time and labor.

  1. Enable cached mode and offline mode. Go to Tools > Settings > Windows Update, and then check the box to enable cached mode as well as the box to enable offline mode. Also set the Local update cache directory to a folder on your computer that has enough free space to store numerous Windows Update files. The amount of space required completely depends on how many updates need to be applied to target computers, the size of each update, the number of different operating systems you are deploying to, and whether or not you choose to retain cached files after they have been distributed to target computers. When cached mode and offline mode have been enabled, indicators are placed in the upper-right corner of the BatchPatch window.
    BatchPatchToolsSettingsOfflineMode
  2. In the same Tools > Settings > Windows Update window, also take note of the Server Selection option. When cached mode and offline mode are both enabled, target hosts will perform an offline search for updates against the offline scan file that Microsoft publishes each month. The target hosts will then report back to BatchPatch with their lists of available updates. BatchPatch will then download the updates from Microsoft’s public server. The Server Selection setting is disabled/grayed-out when offline mode is enabled because in this case the search for updates by each target computer is always performed against the Microsoft offline scan file, with the actual update files being retrieved by BatchPatch from Microsoft’s public server.
  3. On a computer that does have internet access we have to download the Microsoft Offline Scan file. Launch BatchPatch and click on Tools > Download Microsoft Offline Scan File. If the menu item is disabled/grayed-out, please make sure that ‘cached mode’ has been enabled. Once ‘cached mode’ is enabled, the menu item will no longer be grayed-out. The local downloader form will be displayed, and the WsusScn2.cab file will be downloaded to the local cache directory specified in step 1.
    BatchPatchDownloadMicrosoftOfflineScanFileMenuItem

    BatchPatchDownloadMicrosoftOfflineScanFile
  4. Now that the Microsoft Offline Scan file has been downloaded to the cache directory, the directory needs to be manually moved to the offline network. Use whatever method you prefer, such as copying the directory to a USB drive, and then moving that USB drive to a computer on the offline network. Once the cache directory has been moved to a computer in the offline network, launch BatchPatch on that computer and make sure that ‘cached mode’ and ‘offline mode’ are both enabled, and that the local cache directory setting in Tools > Settings > Windows Update is pointing to the same location as the Microsoft Offline Scan file (WsusScn2.cab).
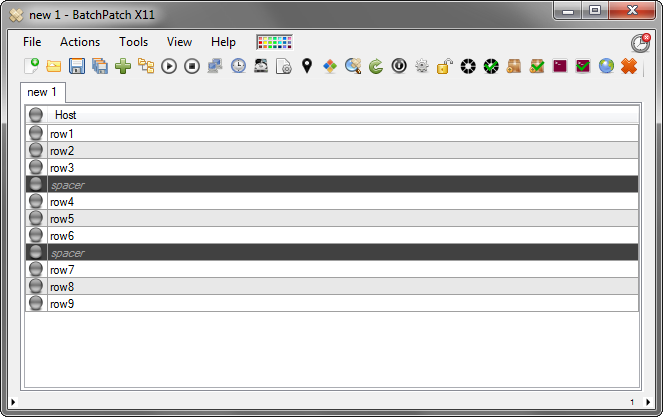
  5. Add hosts to the BatchPatch grid using File > Add hosts…
    BatchPatchAddHostsOfflineMode
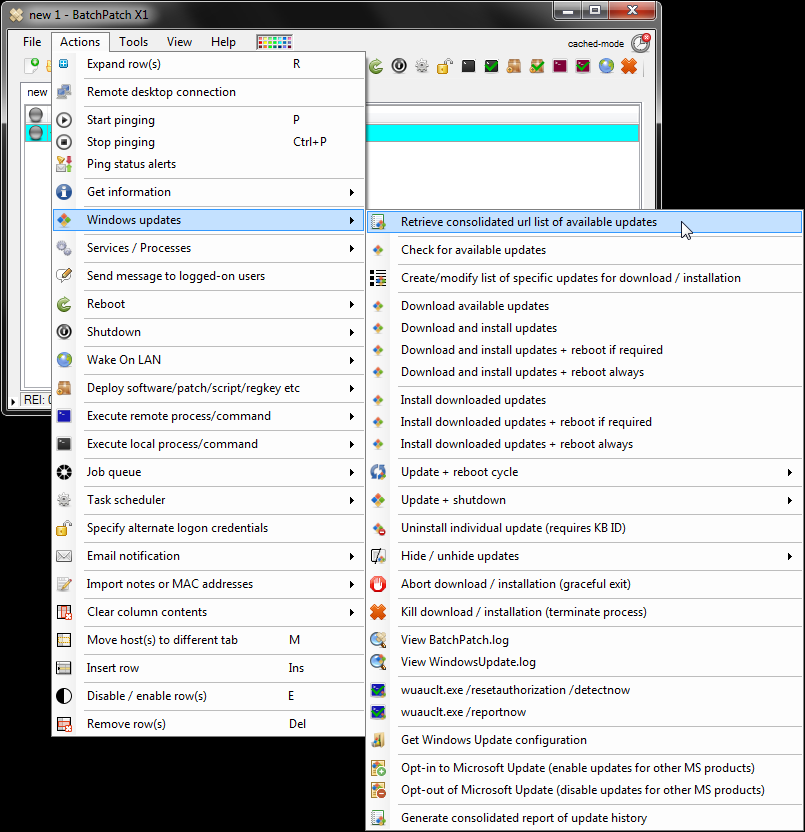
  6. With ‘cached mode’ and ‘offline mode’ enabled, we now need to check for available updates and generate a consolidated URL list. Highlight the target hosts in the BatchPatch grid and select Actions > Windows Updates > Retrieve consolidated url list of available updates. During this process BatchPatch will first copy the wsusscn2.cab file to the target computers. The target computers will then use the wsussc2.cab file to determine what updates are available for installation. The list of available updates will be reported back to BatchPatch.
    BatchPatchRetrieveConsolidatedUrlListOfAvailableUpdates
  7. When the action completes, we’ll have a list of update files and urls presented in a new window. Duplicates are automatically removed so that only one copy of each needed update is displayed. However, since we do not have internet access on the computer that’s running BatchPatch, we cannot download the updates directly from this window. Instead, save the url list to a file, using File > Save.
    BatchPatchConsolidatedUrlList
  8. The next step is to move the new .bpurl file that you just created back to the computer that has internet access. Launch BatchPatch on this computer, and then select File > Open BP Url List… and browse to the .bpurl file that you created in the previous step. Now use the Download files to local cache button at the top of the form to initiate the download process. A new BP Update Downloader window will be launched, and the download process will begin.
    BatchPatchOpenBPUrlListMenuItem
    BatchPatchConsolidatedUrlList2
    BatchPatchUpdateDownloaderDownloadingUpdates
  9. Once the download process has completed, all of the files required by the target computers should be sitting in the local cache directory. So, the next step is to move the populated cache directory to a computer on the offline network. Again, please use whatever method is appropriate for your environment in order to transfer the files from the online network to the offline network, such as a USB drive.
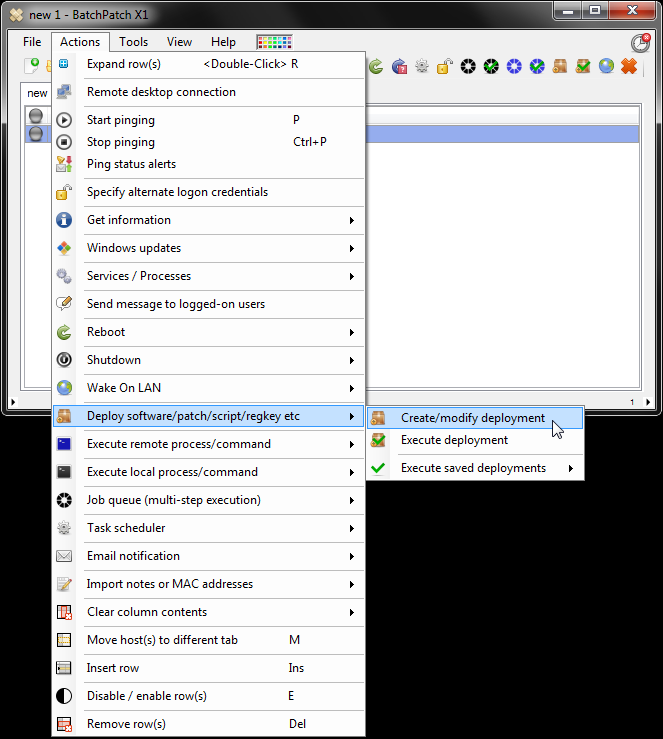
  10. At this point the setup process is complete. You should have a folder full of update files on a computer that is attached to the offline network. BatchPatch should be launched with cached mode and offline mode enabled. The local update cache directory specified in Tools > Settings > Windows Update must point to the directory that contains all of the update files that you just moved. You may now proceed to update your computers. Highlight your hosts in the grid and select Actions > Windows Updates > Download and install updates + reboot if required. The target computers will now all “download” their updates from the BatchPatch computer’s local cache. I use quotation marks around “download” because what actually happens is the BatchPatch computer copies the appropriate update files to the target computers. The target computers then add these files to their Windows Update cache, and then the updates are installed.
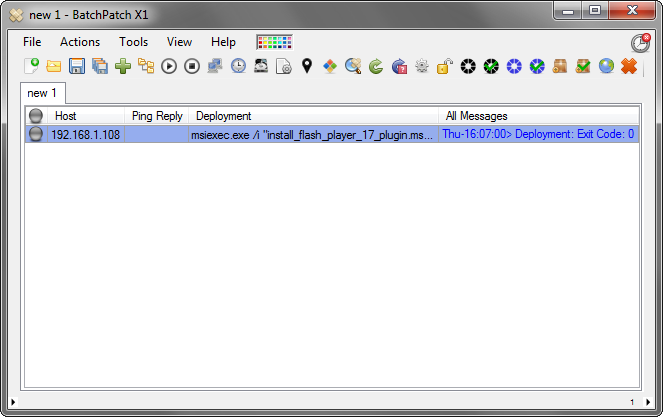
  11. I have included a series of screenshots below to show the whole the process. Upon completion we have the overall content logged to the ‘All Messages’ column, with detailed information in the ‘Local Agent’ and ‘Remote Agent’ logs.

    The computer that is running BatchPatch will copy the most recently published WsusScn2.cab offline scan file that was downloaded in an earlier step to the target host.
    BPCopyingWsusScn2ToTarget

    BatchPatch instructs the target host to perform a search for available updates against the WsusScn2.cab file, which is why the target host does not require internet access to perform its search.
    BPSearching

    The list of available updates on the target host is copied back to the BatchPatch console. Since the updates were all previously downloaded to BatchPatch’s local cache directory, BatchPatch proceeds to copy the required updates to the target host.
    BPCopying

    After the updates have been copied to the target host, the target host must move the files to its Windows Update cache.
    BPCaching

    When the caching process completes, the installation is finally ready to be executed.
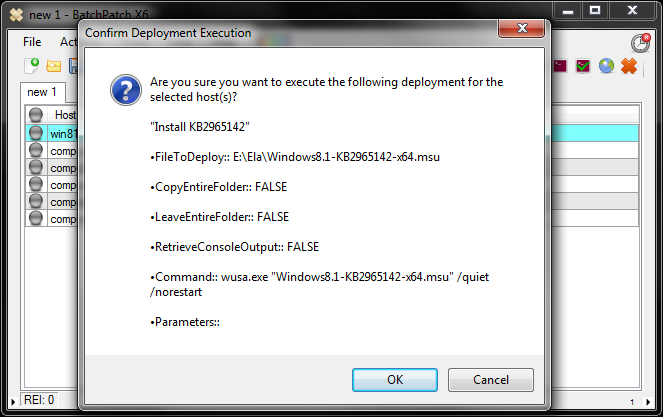
    BPInstalling

    After installation, the target host is rebooted and the process is complete.
    BatchPatchOfflineModeDownloadInstallRebootAllMessagesLog

Getting The Most Out Of BatchPatch

$
0
0

We’ve been doing our best to get new features and functionality added to BatchPatch as quickly as possible, and there’s still a lot more to come. However, today I wanted to take some time to discuss how to get the most out of what’s currently available. Below are some tips for general BatchPatch usage to help an administrator work as efficiently as possible.

Organization:

Using BatchPatch Project (BPP) Files
When you’re managing a large number of hosts it’s likely that you’ll have them divided into groups. For example, you might have production SQL servers in one group, testing SQL servers in another, email servers in another, and so on. Aside from being able to load different groups of computers into different BatchPatch tabs, you might find that creating .bpp files helps you streamline your process. A .bpp file is simply a text file with a .bpp extension that contains a list of filepaths, with each filepath pointing to a different .bps or .bpt file. The nice thing about .bpp files is it gives you another level of organization. So, let’s say you have 5 tabs of database servers… DatabaseGroup1, DatabaseGroup2, DatabaseGroup3… DatabaseGroup5. And let’s also assume you have saved each tab to its own .bps file. Well, if you create a .bpp file either through ‘File > Generate project file’ or by manually editing a text file, you can easily group all of your database servers into a single project. If you launch the single .bpp file in BatchPatch, it will automatically populate the 5 grids with each database server group. You can take this a step further and create one .bpp file for each instance of BatchPatch that you want to run. Then if you launch multiple .bpp files at once, each .bpp file will create a brand new instance of BatchPatch. Each instance will contain one tab for each filepath specfied in the corresponding .bpp file. So, if you have 5 .bpp files, and each .bpp file contains 5 filepaths to different .bps or .bpt files, then when you launch all 5 .bpp files you’ll end up with 5 separate instances of BatchPatch. Each instance will contain 5 tabs.

Using BatchPatch Template (BPT) Files
.bpt files are another convenient way for staying organized when it comes to setting up your BatchPatch instances. A .bpt file is identical to a .bps file in every way except for the file extension which is .bpt instead of .bps, of course. You can create a .bpt file by either manually renaming a .bps file or by using the ‘File > Generate template file’ option in BatchPatch. .bpt files are nice because they allow you to create a template grid that BatchPatch will never overwrite. So, let’s say you want to start your patching run this week/month/quarter, and you load several .bpt files into BatchPatch. Each file might contain entries in the ‘host’ column and the ‘notes’ column. If you execute actions on the hosts in the grid and then go to save the grid, you will be prompted to save a new .bps file rather than overwriting the existing .bpt file. There’s nothing more to it, but this simple task can make it easier to repeat tasks each week or month without having to copy and paste, and without having to worry about accidentally overwriting a .bps file that you were using as a template.

Row Separators
What if you have a need/desire to have only a single tab of computers, but you want to create some visual separate between the servers in that single grid? You can create a “spacer” row using the “Enable/disable” feature. Create a “dummy” row and then use ‘Actions > Enable/disable’ to disable the row, which will color it dark gray. Voila! Now it functions as a visual separator.
BPSpacerRows

Efficiency:

Customizing Toolstrip Buttons:
Did you know that you can customize the buttons that are displayed on the toolstrip, thereby enabling you to have almost any BatchPatch action be available with a single click. Click on ‘Tools > Customize visible toolstrip buttons.’ From there you can simply select any action that you want to appear on the toolstrip.

Hard-coding User-defined Commands Into the BatchPatch Menu:
A lot of BatchPatch users have a set of remote commands that they regularly run on target hosts, either to collect information or to execute remote processes. BatchPatch allows you to “hard-code” any command into the BatchPatch menu so that commands you use frequently that aren’t built-in to BatchPatch are just as easily accessible to you as commands that are pre-built-in to the application. For example, BatchPatch has a built-in action for killing remote processes. You can select ‘Actions > Services / Processes > Kill specific running process,’ which lets you input a process name or PID to kill on target systems. This is great, but what if for some reason you always find yourself having to kill the same rogue process repeatedly on your systems? Wouldn’t it be nice to not always have to type in the process name? Well, you can create a user-defined command under ‘Actions > Remote process/command > Create / modify user-defined commands.’ You could then enter the following command into the window provided.

WMIC PROCESS where name='rogueProcess.exe' call terminate

Once you’ve entered a command, it will now be automatically saved so that it appears hard-coded in the ‘Actions > Remote process/command > Execute user-defined commands’ menu! Pretty neat. Now any time you need to kill that rogue process, you can simply click on the menu item that you just created, and that process will be killed without prompting you to enter a process name.

Middle-click Cells to View Cell Contents:
Any time you need to see the entire contents of a cell in a BatchPatch grid, the easiest way to do this is to just middle-click (scroll-wheel-click) on the cell. The cell contents are displayed in a custom tooltip window.

Right-click-drag on Cell Contents Tooltip to Move it to a New Location:
You can move the cell contents tooltip window around on your screen by right-clicking anywhere on it, and then dragging it to a new location.

Remotely Deploy Windows Updates To Computers With No Internet Access

$
0
0

We recently added two new features to BatchPatch: Cached Mode and Offline Mode. The use of these two features together enables administrators to deploy windows updates to remote computers when the computers do not have internet access.

For those of you who are working with highly secure networks that are completely detached from the world, or if you simply have a network that doesn’t have internet access or a WSUS server, you can use Offline Mode to install windows updates on all of your computers, simultaneously, in just a few steps.

The general outline is as follows:

  1. Enable both Cached Mode and Offline Mode in BatchPatch.
  2. Run BatchPatch in the offline network to determine which updates are needed by the target computers.
  3. Run BatchPatch on a computer that *does* have internet access, so that it can download the updates needed by the offline computers.
  4. Copy all of the downloaded update files on an external hard drive to the offline network.
  5. Run BatchPatch on the offline network to deploy the repository of updates that were copied in the previous step.

The detailed tutorials are below:

Offline Mode When BatchPatch Has Internet Access But Target Computers Do Not

If you’re using BatchPatch on a network where BatchPatch has access to the internet but the target computers that you’re deploying updates on do not have internet access, then please follow this tutorial:
Using BatchPatch In ‘Offline Mode’ When BatchPatch Has Internet Access

Offline Mode When BatchPatch And Target Computer Do Not Have Internet Access

If you’re using BatchPatch on a network where neither the BatchPatch computer nor the target computers have internet access, please follow this tutorial:
Using BatchPatch In Offline Mode When BatchPatch Does Not Have Internet Access
BatchPatchCachedModeOfflineModeEnabled

Importing Notes or MAC Addresses into BatchPatch

$
0
0

Generally speaking there usually isn’t a need to import MAC addresses into BatchPatch because you can use Actions > Get Information > Get MAC address to retrieve the MAC addresses for hosts that are in the grid. However, there are still times where you might need or want to import MAC addresses. For example, maybe your machines are not on the network at the time that you want to add the MACs to BatchPatch, or it’s possible that using the ‘Get MAC address’ action is retrieving the MAC address for a different network adapter than you want to use for Wake On LAN.

With regard to notes, you may very well want to populate the ‘Notes’ column in BatchPatch with instructions or notes about computers in the grid. There are a couple of different ways to accomplish this task.

Import Notes or MACs When You Import Hosts

The process for adding MAC addresses or notes is very simple. You can import directly from a text file or by simply typing directly into the ‘Add hosts’ dialog, which is accessed under File > Add hosts

The format that you need to use is as follows:

host1|Notes for host1
host2|Notes for host2
host3#1CF6565D4631
host4#C16F342E3521
host5#D2FF245C1432|Notes for host5
host6#D2DC425C1432|Notes for host6

If you copy the above text exactly as it is written and then paste it into the File > Add hosts dialog, you’ll see that the hosts, MACs, and notes are all entered at once into the BatchPatch grid. The following screenshot illustrates this:
ImportingHostsMacsNotes

If you instead paste the above text into a .txt file, you can simply use the File > Open to browse to the .txt file and import it. The results will be identical to the screenshot above.

Import Notes or MACs for Hosts that Already Exist in the Grid

If you already have a grid that’s populated with hosts but you want to add MACs or Notes to that existing grid, the process is almost identical to the steps outlined above. The only difference in this case is that instead of using File > Open or File > Add hosts, you’ll need to first highlight the hosts that you want to import notes or MACs for, and then use Actions > Import notes or MAC addresses.

The format of the .txt file for importing notes should be:

host1|Notes for host1
host2|Notes for host2
host3|Notes for host3
host4|Notes for host4

The format of the .txt file for importing MACs should be:

host1#1CF6565D4631
host2#D2FF245C1432
host3#D2DC425C1432
host4#C16F342E3521

That’s all there is to it. Some admins like to keep one big master .txt file list of all Hosts|Notes, and then when it’s time to start patching they simply setup their BatchPatch instances and import the notes. This is preferable in some instances to manually editing cells.

Using ‘Offline Mode’ to Install Windows Updates on Computers That Do Not Have Internet Access or WSUS Access – Video Tutorial

Troubleshooting common errors in BatchPatch

$
0
0

When BatchPatch was designed one of the fundamental tenets was to keep it as simple as possible while also being extremely functional and effective. It was and still is very important to us to make sure that BatchPatch is easy and intuitive to use. That said, as much as we’d like for there to never be any errors, it *is* still software after all, and we use errors to express when there was a problem. The intention of this posting is to cover the most common errors that users encounter, and to provide information to help rectify those errors.

  • The RPC server is unavailable. (Exception from HRESULT: 0x800706BA)

    The most common reason one encounters this error is due to a firewall. BatchPatch needs access to the target machine’s RPC server, and if there is a firewall enabled on the target machine, it will need to be configured to allow the appropriate traffic to pass through. For instructions on configuring BatchPatch to work with Windows Firewall, please see: Using BatchPatch with Windows Firewall

    Another possible reason for this error is because The Remote Procedure Call (RPC) service is not started/running on the target computer. Launch the services console on the target machine (Start > Run > services.msc) and make sure the service is set to Automatic and that it’s started.

    Finally, if the BatchPatch computer is not able to resolve the name of the target computer (typically using NetBIOS or DNS), or if there is simply no response from the target computer or IP address, this is the error that we would expect to see. If, for example, you added a non-existent host or IP address into the BatchPatch grid, and then you tried to perform some action on that non-existent host, you would encounter this RPC error. So, if you are sure that the machine name or IP is correct and that the machine is powered on and connected to the network, then it means that the machine simply isn’t responding to RPC requests, likely due to one of the above-mentioned reasons.

    If you’ve gone through the above information and still get this error, then you’ve probably got something more significant happening with the target computer in question. You might consider looking through Microsoft’s posting and troubleshooting steps here: Windows Server Troubleshooting: “The RPC server is unavailable”

  • Access is denied. (Exception from HRESULT: 0x80070005 (E_ACCESSDENIED))

    This error message is due to an issue with account permissions. The following link explains everything you need to know about resolving permissions problems: BatchPatch Authentication in Domain and Workgroup (non-domain) Environments

  • -102: Failed to execute the search. HRESULT: [Some_HRESULT_value_here]

    The -102 error occurs any time the target computer is unable to execute the search for updates. The HRESULT code that is reported with the -102 error is the key to determining the specific reason for the failure. HRESULT codes will be in decimal format, but we need to convert them to hex in order to figure out what they mean. To do that, you can use a tool such as the one available here: Decimal to Hex Converter. Once you have the hex representation of the HRESULT, you can look it up here to see what it means: Windows Update Error Code List

    In almost all cases the cause is due to a connectivity issue where the target computer is unable to reach or communicate with the WSUS server, ‘Windows Update’ server or ‘Microsoft Update’ server. In the event that a local WSUS server is the location being searched, the most common cause for this error is simply due to the WSUS server being down or offline or unreachable due to some type of network problem. In the event that the location being searched is Windows Update or Microsoft Update, this error is usually the result of the target computer simply not having internet access and therefore not being able to reach Microsoft’s servers. In some cases, the cause of this error is due to a proxy configuration preventing the Windows Update Agent on the target computer from accessing the Windows Update server. For more information on proxies and Windows Update, please see the following links:
    How the Windows Update client determines which proxy server to use to connect to the Windows Update Web site
    BatchPatch Windows Update Proxy Issues 1
    BatchPatch Windows Update Proxy Issues 2

Remotely Installing .NET 4.5.1 on Windows 7 and Windows Server 2008R2

$
0
0

This is an example of using BatchPatch to install .NET 4.5.1 remotely on Windows 7 and Windows 2008R2 computers.

Overview: The process is very straightforward. Add the target hosts to your BatchPatch grid, create the BatchPatch deployment, and then finally execute the deployment. It’s important to always test a new deployment on a single machine before you try to execute it across numerous computers. This way you can iron out any kinks in the process to make sure it’s working properly before you move forward with it on your entire network.

Important: Please try to remember that any remote deployment task in BatchPatch requires that the installation be executed silently / quietly. When I say “silent” or “quiet” installation, I mean that the installation process needs to be executed without requiring any user interaction whatsoever. As you know, many installer packages will prompt the logged on user to click OK or to select an installation directory or to specify some other installation-specific options. However, in the case of a remote installation, there won’t be any opportunity to click on various options that the installer presents. In fact, if the installer presents any options, the presentation of these options will actually be hidden from the view of any logged on users because it’s being executed in the background. In this case the installation will simply appear to hang indefinitely without ever completing. So, any time you’ve attempted a deployment and it appears to be hanging with no completion, then you can rest assured knowing that it’s simply waiting for user input. In that case, since the remote deployment is hidden from view, you would have to manually kill the installation process on the target computer and then start over again with the correct silent/quiet parameters.

  1. Determine the “silent” / “quiet” installation parameter:
    You can generally learn what the “silent” / “quiet” parameters are by executing the installation at the command line with the “/?” or “/help” parameter. For example, take a look at the screenshots below, where I have launched the .NET installer package with the “/?” parameter. Doing so displays a windows with all of the installation options.

    cmd_dotNetInstaller_Help
    dotNet451InstallerOptions

  2. Create the deployment:
    Highlight the host(s) and choose Actions > Deployment > Create/modify deployment. In the window that appears, you’ll select the location of the .NET installer file, and you’ll add the “/q” parameter to ensure that the installation executes without any interaction. In the screenshot below you can see I’ve also added the /log parameter, so that I can review the installation log in the event of a problem or failure. Note: The installation package that I’m using is the offline installer that Microsoft offers. You will not be able to use their online installer for this silent deployment because their online installer does not offer a silent/quiet installation parameter. The offline installer is available here: http://www.microsoft.com/en-us/download/details.aspx?id=40779
    dotNetOfflineInstallerDeployment4.5.1
  3. I’ve saved the Deployment, and now I can execute it using Actions > Deployments > Execute saved deployment
    ExecuteDotNet451Deployment
    Confirm the deployment configuration and click OK on the prompt that appears:
    2014-12-08 13_33_22-new 1 - BatchPatch X1
  4. .NET Installer Exit Codes:
    0: Installation completed successfully.
    1602: The user canceled installation.
    1603: A fatal error occurred during installation.
    1641: A restart is required to complete the installation. This message indicates success.
    3010: A restart is required to complete the installation. This message indicates success.
    5100: The user’s computer does not meet system requirements.

Multi-Step Execution Using the Job Queue

$
0
0

Last week we published an update to the BatchPatch Job Queue that adds some nice new features, and I thought I’d take some time to show you what you can do with it.

BatchPatch Job Queue

In the new Job Queue interface you’ll find the following items that weren’t previously available:

  • Wait for host to go offline and come back online:
    In previous versions of BatchPatch if you executed a task that involved rebooting a computer, you didn’t have a way to start the next task in the queue as soon as the computer finished rebooting. Instead you’d have to set a “wait” period of something like 10 minutes, after which the next task would begin, regardless of whether or not the computer had actually finished rebooting.

    However, in the new Job Queue you now have the option to Wait for host to go offline and come back online. If you insert this special item after a reboot task, BatchPatch will automatically keep track of the target computer’s status, waiting for the machine to go offline and then come back online before proceeding with the next task. The next task will not begin until BatchPatch is able to confirm that the target computer is replying to pings *and* also responding to Windows Management Instrumentation (WMI) queries. If a ping is successful but the machine isn’t ready to respond to WMI queries, BatchPatch will wait a minute before it tries again. As soon as it gets a valid response from WMI, it will proceed with the next task in the queue.

    Note, there is an additional setting in the Job Queue that allows you to set the timeout threshold for this feature. See ‘Wait for host to go offline / come online’ global timeout (minutes). The default value is set to 60 minutes. If the host never goes offline (maybe it hangs while it’s shutting down) or if the host goes offline but never comes back online and/or never begins responding to WMI queries within the 60 minute window, BatchPatch will simply stop processing the job queue for that host.
  • Stop queue execution if previous action fails/errors
  • Inserting this new special item in a queue after a custom script gives you the ability to make sure that BatchPatch will not proceed with the queue execution if the custom script does not run successfully. When this Stop queue execution if previous action fails/errors item is reached in the queue, BatchPatch will check the previous action’s exit code. If the previous action’s exit code is non-zero, BatchPatch will terminate the queue.

  • Saved User-Defined Commands and Deployments
  • The new Job Queue interface now lets you add your own saved commands and deployments to a queue. We know that a lot of you have been waiting for this, and we’re pleased that it’s finally available for you.

  • Saved Queues
  • You can finally save your job queues for future execution! This is another item that many of you have been waiting for. The cool thing is that once you save a queue, it will then appear “hard-coded” into the BatchPatch actions menu for future execution. You can execute a saved queue by highlighting hosts in the grid and then selecting Actions > Job Queue > Execute saved job queues. See the screenshot below:
    2014-12-18 12_21_17-Program Manager


Determine if a Particular Windows Update is Installed on Remote Computers

$
0
0

Windows administrators periodically need to check their systems to determine if a particular update has been installed. BatchPatch provides a simple way to scan for previously installed Windows Updates on numerous remote computers. You can use this facility to generate a consolidated report of the computers that have a particular update installed, or you can generate a report of all installed updates on all computers. It’s up to you.

Add hosts to a grid in BatchPatch, and then highlight the desired hosts and right-click > Windows Updates > Generate consolidated report of update history. This will bring up the report settings window. Since the purpose of this tutorial is to search for a particular update, let’s examine our options for doing this.

BatchPatch_ConsolidatedUpdateHistoryReport

One option is we can use the “Filter by title:” section to specify which update we are looking for. Perhaps we need to find computers with KB2800095 installed. All we have to do is enter that particular ID into the ‘Filter by title’ field before we execute the search. In the screenshot below you can see I’ve set the search preferences to only include the last 300 days, and I’ve entered ‘2800095’ into the ‘Include’ section of the filter options. When I execute the search I expect to get a list of machines that had this update installed within the past 300 days.

2014-12-29 13_07_36-new 1 - BatchPatch X2

Click ‘Generate Report’ to begin the search process. When the search completes, we can see both of the machines that we searched had this update installed in the past 300 days.

2014-12-29 13_11_53-Consolidated Update History Report

Pretty simple, right? The other option we have for obtaining this information is very similar, but in this case we would leave the ‘Filter by title:’ section blank. In this case we’ll simply retrieve all updates that have been installed on the selected computers during the past 300 days. Once we have this complete list, we can then do a search for the particular update in question, or we can sort by update title. As you can see in the screenshot below, I simply typed ‘2800095’ into the “Find” field, and the first computer with that update installed was highlighted. Continually clicking the ‘Find’ button will rotate through every search hit, as you would expect.

2014-12-29 13_19_08-Consolidated Update History Report

That’s all there is to it. I told you it was simple!

Remotely Deploy a Standalone .MSU Update to Multiple Computers

$
0
0

You need to install a single .MSU update on many computers, but you don’t want to log on to each computer to initiate a manual installation, and you don’t want to deal with writing a script. I know how you feel. I’ve been there many times. The good news is that with BatchPatch you can take care of the entire process with just a few clicks and a couple of minutes. Here’s how it works…

In the example below we will remotely install update KB2965142 using a standalone .msu file obtained from Microsoft.

  1. In the BatchPatch grid, highlight the computers that you will be deploying the update to. In the screenshot below you’ll see that I’m only deploying the update to a single target computer. However, if you are working with many target computers you can simply highlight all of them instead of just one. All other steps are identical.
    2015-01-08 13_54_53-new 1 - BatchPatch X6
  2. With the host(s) selected, let’s now create the deployment by clicking ‘Actions > Deploy > Create/modify deployment.’ In the deployment window we’ll select the .msu file from our computer, and then we’ll select the ‘ install’ radio button as well as the ‘/norestart’ checkbox since I don’t want the target computer to restart on its own. We can optionally also give this deployment a title so that it can be saved for later use. In this example I’ve used the title ‘Install KB2965142.’ To save it simply click the >> button, which will add it to the list of ‘Saved Deployments.’
  3. 2015-01-08 14_12_34-Deploy .msi .msp .msu .exe .reg .vbs .bat .cmd .ps1 etc

  4. Once the deployment is created we can either execute it immediately for the highlighted rows by clicking the “Execute now” button, or we can close the deployment window and execute it later directly from the Actions menu. In this case let’s close the window so that you can see how it works when you save a deployment before executing it. After closing the deployment window, simply highlight the hosts, right click or use the actions menu, and select ‘Deploy > Execute saved deployment > Install KB2965142.’ We can see that as soon as the ‘Install KB2965142′ is selected, a tooltip appears showing us that particular saved deployment’s configuration. The configuration is, of course, the same configuration that we applied in the previous step before we saved the deployment.
    2015-01-08 14_12_48-Program Manager
  5. We are now presented with a confirmation dialog, which gives us another opportunity to verify the configuration of the deployment that we are about to execute. Click ‘OK’ to begin execution.
    2015-01-08 14_15_12-new 1 - BatchPatch X6
  6. When the installation completes we get exit code 3010, which indicates that the installation was successful but a reboot is required to complete it. We can use BatchPatch to initiate the reboot at our convenience.
    2015-01-08 14_38_11-new 1 - BatchPatch X6

BatchPatch Tips and Shortcuts

$
0
0
  • Diplaying cell contents: The quickest and simplest way to view the content of any particular cell in a BatchPatch grid is to middle-click on the cell. The middle-click button is the same as the scroll-wheel on most mouses. If you didn’t already know, the wheel is also a button that can be clicked/pushed just like a regular left or right mouse button. Middle-click a cell to quickly view its contents.
    MiddleClickToolTip
  • Moving the cell contents tooltip/window: After you display the cell contents with middle-click, sometimes you might want or need to move the tooltip that is displayed to a new location. You can do this by right-clicking anywhere on that tooltip/window. Then just drag it to the desired location.
  • Expanding row contents: You can double-click on any row in the grid to display the entire row’s contents in an HTML formatted window. If you want to view the contents of more than one row at a time, then simply highlight the rows and press the ‘R’ key on your keyboard. Alternatively you may right-click on the selected rows and then click the option to ‘Expand row(s)’
    ExpandRowContents
  • Moving rows up/down in the grid: You might not have realized that you can move individual rows or groups of rows up and down in the grid without sorting the entire grid. Highlight the rows you want to move and then hold down the CTRL key and press the + or - key to move the rows up or down.
    MovingRows
  • Re-arranging icons/buttons on the ToolStrip/ToolBar: Hold down the ALT key, and then select the button you want move with left-click. Drag it to a new location on the ToolStrip and it will stay there. If you ever want or need to reset the ToolStrip back to its default configuration, you can do that by selecting ‘Tools > Reset toolstrip to default configuration.’
  • Toggling the grid border style: Pressing CTRL-B will toggle through the 4 possible grid border style options. You can have no cell borders, horizontal borders only, vertical borders only, or both horizontal and vertical borders, which is the default configuration.
    BorderStyle
  • Modifying the row selection color: If you don’t like the default yellow row selection color, make it any color you want. Select ‘Tools > Row selection color’ or simply click on the color palette icon in the menu strip. You’ll be presented with a new window where you can either select one of the out-of-box colors or set your own color by clicking on the color palette.
    RowSelectionColor
  • Changing the intensity of the alternating row background color: There is a tiny little arrow icon in the lower-left corner of the BatchPatch window. Clicking this icon reveals a slider that lets you change the intensity of the gray row background color for alternating rows in the grid. You can disable it altogether by dragging the slider to the lowest possible position.
  • Transparency: Yes, it’s true that BatchPatch supports transparency, if you so desire. This is one of those features that we included for fun, simply because we could (not because we think it’s useful). :) In the lower-right corner of the BatchPatch window there is a tiny arrow icon. If you click on this icon a slider will appear. Lower the slider if you want to make the BatchPatch window transparent.
  • LED images: The column that appears farthest to the left in the BatchPatch grid contains ‘LED’ images to indicate online/offline status of computers in the grid. While these LED images will change color when a row is rebooted or pinged, did you know that you can also control these images independently of what actions are executed for a given row? For example, if you load a list of hosts into a grid, you can simply left-click on the LED image row header to start (or stop) an online/offline check for all hosts in the grid. Furthermore, if you middle-click the LED image row header, all LED images in the grid will be reset to gray. Middle-clicking the LED image of a specific row will disable that particular row from being included in the online/offline status check. Shift-middle-clicking a specific row’s LED image will turn that image blue, which can be used to indicate ‘completion’ if you desire.
    LED_Demo
  • Importing hosts: Did you know that when importing computer names or IP addresses into the BatchPatch grid, you can simultaneously import MAC addresses and/or general notes? For example, when you select ‘File > Add Hosts’ you aren’t limited to just adding a list of computer names. If you want to add a MAC address with each computer, you can do so by formatting your list as follows:

    host1#1C6F65D56413
    host2#2D:5E:43:F2:21:24


    If you want to populate the ‘Notes’ column for a given host, then you can use the following syntax:

    host4|notes for host4
    host5|notes for host5


    If you want to populate both MAC and Notes for your hosts, then use this syntax:

    host1#1C6F65D56413
    host2#2D:5E:43:F2:21:24
    host3#1B3A65B54322|notes for host3
    host4|notes for host4


    Note, you can also create a text file using the above syntax, and then simply drag and drop the .txt file onto the BatchPatch window, or use ‘File > Open’ from within BatchPatch to browse to the .txt file.

BatchPatch Ports

$
0
0

Remote connections in BatchPatch are established using a combination of WMI (Windows Management Instrumentation) and PsExec.

In order for PsExec to work properly…
The target computer has to have ports 135 and 445 open, and the BatchPatch computer must be able to access the admin$ share on the target computer. If you are using Windows Firewall on the target computer, then the only thing you need to do is create an exception for “File and Printer sharing.” More details on configuring Windows Firewall can be found here: Using BatchPatch with Windows Firewall. However, if you are not using Windows Firewall, then you would need to explicitly permit traffic to the target computer from the BatchPatch computer on ports 135 and 445.

As a test, after you configure the firewall you should try to connect from the BatchPatch computer to the target computer’s admin$ share, which you can do by going to ‘Start > Run > \\targetComputer\admin$’ from the BatchPatch computer.

In order for WMI to work properly…
The target computer must be able to receive and process RPC (Remote Procedure Call) requests. Both the WMI and RPC services must be running on the target computer. If you’re using Windows Firewall on the target computer, then please follow the instructions on this page to configure it properly: Using BatchPatch with Windows Firewall.

If you are using a hardware firewall, the configuration for WMI can potentially be a bit trickier, depending on the particular firewall device. WMI connections, by default, are not established on a static/fixed port. Instead WMI uses dynamic port configuration for its connections, which means that the actual ports used for a given connection are established on-the-fly at the time of connection. Each connection will end up using different ports. In the context of a classic hardware firewall, this used to be a problem because hardware firewalls would typically require any open ports to be configured manually. An enterprise firewall administrator could never know in advance which ports would need to be opened. However, fortunately many modern firewalls now implement DCE/RPC, which solves this problem and allows the use of dynamic ports for WMI/RPC. If you have a network level hardware firewall in place between the BatchPatch computer and the target computers, you’ll need to configure it to allow DCE/RPC, so that it can open the necessary ports, on-the-fly, for each WMI connection. More info on DCE/RPC can be found at the following two links:

https://en.wikipedia.org/wiki/DCE/RPC
http://wiki.wireshark.org/DCE/RPC

Uninstalling Java Remotely from Numerous Computers

$
0
0

One task that nearly every administrator has to complete at some point or another is the removal of Java. As with many typical sysadmin tasks, removing software on remote computers is very quick and simple with BatchPatch. Today I’d like to show you how to remove Java from many computers using BatchPatch. We have a few different options for executing the uninstallation, so take a look through all options before deciding which one you want to use. IMPORTANT: Always test a destructive process like this on a non-production machine before you attempt to perform an action on one or many production machines!

Method 1 (Preferred Method): Uninstall a specific Java version, by UninstallString:

    This method provides more precision since it uses the exact uninstall string for the application instead of a name search. However, it also requires a bit more effort.
  1. First we need to locate the UninstallString value in the registry for the version of Java that we want to remove. Generally one of the following two registry keys will contain the UninstallString value that we are looking for:

    HKEY_LOCAL_MACHINE\SOFTWARE\Microsoft\Windows\CurrentVersion\Uninstall
    OR
    HKEY_LOCAL_MACHINE\SOFTWARE\Wow6432Node\Microsoft\Windows\CurrentVersion\Uninstall

    On my test machine I located the UninstallString value for Java 8 Update 31, and it contains the following data:
    MsiExec.exe /I{26A24AE4-039D-4CA4-87B4-2F83218031F0}
  2. In BatchPatch, highlight the target hosts and select ‘Actions > Execute remote process/command > Create/modify remote command 1′. Enter the following syntax into the command field, substituting the correct string for the particular version of Java that you are uninstalling:
    MsiExec.exe /qn /X{26A24AE4-039D-4CA4-87B4-2F83218031F0} /norestart
  3. Click the ‘Execute’ button
    2015-01-28 18_18_25-new 4 - BatchPatch X1
  4. In the ‘All Messages’ column we see exit code 0, which indicates success.
    2015-01-28 18_19_32-new 4 - BatchPatch X1


IMPORTANT NOTE:

Methods 2 and 3 should be used with caution. Both of the following uninstallation methods utilize the Win32_Product class. However, before proceeding with either method, please review this article to learn why some sysadmins are opposed to using the Win32_Product class.

Method 2: Uninstall a specific Java version, by name query:

  1. In BatchPatch, highlight the target hosts and select ‘Actions > Execute remote process/command > Create/modify remote command 3 (logged output)’. Enter the following syntax into the command field, substituting the version of Java that you want to remove. Make sure that the name you use matches the exact name that appears in the ‘Add/Remove Programs’ wizard on the target computer(s):
    wmic product where (name = 'Java 8 Update 31') call uninstall
  2. Click the ‘Execute’ button
    2015-01-28 18_13_18-new 2 - BatchPatch X1
  3. You can see in the screenshot below that this command returns successfully with exit code 0. Also, the ‘Remote Command Output Log’ column shows the output that was returned by the target, giving us additional confirmation of what was executed.
    2015-01-28 18_01_40-Program Manager

Method 3: Uninstall all versions of Java, by name query

Method 3 and Method 1 are similar, except we change the query in Method 3 to include all software products on the computer that begin with the name ‘Java’

  1. In BatchPatch, highlight the target hosts and select ‘Actions > Execute remote process/command > Create/modify remote command 3 (logged output)’. Enter the following syntax into the command field:
    wmic product where (name like 'Java%') call uninstall
  2. Click the ‘Execute’ button
    2015-01-28 18_24_41-new 5 - BatchPatch X1
  3. You can see in the screenshot below that this command returns successfully with exit code 0. Also, the ‘Remote Command Output Log’ column shows the output that was returned by the target, giving us additional confirmation of what was executed. Note, in this case every app on the computer that has a name beginning with ‘Java’ is removed. The reason we see a return code of 1605 for the ‘Java Auto Updater’ is because the Java uninstallation was executed first, and the Java Auto Updater was removed as part of the Java uninstallation. WMIC didn’t know that, of course, so when it tried to remove ‘Java Auto Updater,’ it returned 1605, because ‘Java Auto Update’ was already removed. 1605 translates to ERROR_UNKNOWN_PRODUCT - This action is only valid for products that are currently installed.
    2015-01-28 18_26_10-new 5 - BatchPatch X1

Sequencing Updates and Reboots Across Multiple Target Hosts

$
0
0

One of the questions we get sometimes is how do you update and reboot a set of computers in a specific sequence, without having to babysit the entire process?

In the most recent version of BatchPatch we introduced the ‘multi-row job queue sequence.’ This new feature takes the existing job queue to the next level by allowing you to string together job queues from multiple rows in the BatchPatch grid all into a single, larger multi-row (multi-host) job queue.

So, let’s say you have 10 machines, and you want them to be updated and rebooted one at a time, so that no more than one host from the group is ever offline at any given time. You can use the new ‘multi-row job queue sequence’ to accomplish this. Another potential use case is for a virtual machine environment. You might want to update each guest VM in sequence, followed by the VM host. (NOTE: We also have some additional VM Guest/Host functionality planned for a future build, which will provide a one-click way to update all guest VMs simultaneously, and then update the VM host as soon as all guests complete their operations).

Below I explain how to use the new ‘multi-row job queue sequence’ to perform a simple ordered reboot sequence for 3 hosts. The goal here is to reboot host1, wait for it to go offline and come back online, then reboot host2 and wait for it to go offline and come back online, and then finally reboot host3.

  1. First we need to apply a job queue to each row that we want to include in the multi-row job queue sequence. Highlight the hosts and then select ‘Actions > Job queue > Create/modify job queue’. The job queue that we’re creating contains only 2 items:

    Reboot (force, if required)
    Wait for host to go offline and come back online

    Click ‘Apply queue to row(s) without executing’
    2015-02-10 17_34_38-Job Queue

  2. After applying the queues to the selected rows we’re ready to start our multi-row job queue sequence. Highlight the rows in the order that you want them to be processed. Then select ‘Actions > Job queue > Execute multi-row job queue sequence’
    2015-02-10 17_39_21-Program Manager
  3. That’s all there is to it! In the screenshot below you can see that our first host is in the process of rebooting and ‘waiting for host to go offline and come back online.’ The second and third hosts are queued.
    2015-02-10 17_43_58-new 1 - BatchPatch X3

Virtual Machine Guest + Host Update and Reboot Sequence Automation

$
0
0

Today I want to take some time to address a common scenario for administrators of virtual machine environments. In the most recent release of BatchPatch we added a new feature called the ‘Advanced multi-row queue sequence,’ which allows the BatchPatch administrator to create more complex update and reboot sequences than were previously possible. One example of where this can really come in handy is for virtual machine environments.

Imagine for a moment that you have a Hyper-V host with a dozen virtual machine guests running on it. When Microsoft ‘Patch Tuesday’ arrives, you want an easy way to update all of the virtual machines and then update the physical VM host, and then finally reboot the VM host. Not only that, but you want to do it by launching a single task that will take care of the entire process so that you don’t have to pay attention to each step along the way. The new ‘Advanced multi-row queue sequence’ in BatchPatch let’s you do exactly that.

For this example, we’ll use the BatchPatch ‘Advanced multi-row queue sequence’ to create and then execute a sequence to download and install Windows Updates on all of the virtual machine guests on a particular virtual machine host. And then as soon as the updates have been installed on all guests, the host will be automatically triggered to download and install updates plus reboot.

  1. To get started let’s select all of the VM guests on Hyper-V_HOST1.
    2015-03-23 16_12_16-new 1 - BatchPatch X8
  2. Next select ‘Actions > Job Queue > Create/modify advanced multi-row queue sequence.’ In the ‘Advanced Multi-Row Queue’ window we have to now choose a name for our sequence, and we have to specify the position number of each host/guest that will participate in it. In the screenshot below you can see that I’ve called the sequence ‘Hyper-V_Sequence1′ and I’ve applied position number 1 value to all of the VM guests, with the VM host getting position number 2. What this means is that when we eventually execute the sequence, all position number 1 rows will execute simultaneously, and then BatchPatch will wait for them to complete. Once all position 1 rows are done, the position 2 row will begin execution. The sequence name is used to determine which rows are participating in a given sequence. If you apply the same sequence name to all rows, then all rows will be included in the same sequence. If you want to have multiple different sequences in a single grid, no problem. To do that you simply need to apply a different sequence name along with appropriate position numbers to each group of hosts.
    2015-03-23 16_15_27-new 1 - BatchPatch X8
  3. Now that we’ve set the sequence name and position numbers, we have to configure the actual action that each row will execute when the sequence is launched. To do this, we select all of the VM guest rows and then go to ‘Actions > Job Queue > Create/modify job queue.’ In the job queue window we’ll select ‘Download and install updates.’ Then we click ‘Apply queue to row(s) without executing.’ Lastly, we select the VM host row and apply a queue to it as well. However, in this case we’ll apply ‘Download and install updates + reboot always.’
    2015-03-23 16_20_10-Job Queue
    We end up with something like this:
    2015-03-23 16_21_30-new 1 - BatchPatch X8
  4. We’re almost done with the setup. The last thing we need to do is create an ‘Execution row’ for the sequence. This is a special row that we designate to enable us to actually launch the sequence. The host name that we specify for the row doesn’t actually matter, but for the sake of clarity I’ve created a new row ‘Hyper-V_Sequence1_ExecutionRow’ in the ‘Host’ field.
  5. 2015-03-23 16_25_19-new 1 - BatchPatch X9

  6. The final step is to execute the sequence. In this example we’ll launch the sequence manually, but you can just as easily launch the sequence at a specific time and date using the ‘Task Scheduler.’ To launch the sequence on-demand, highlight the ‘Execution Row’ and then select ‘Actions > Job Queue > Execute advanced multi-row queue sequence.’ The ‘Confirm Action’ prompt appears and tells us exactly what is about to happen. When we click ‘OK,’ the job queue that we specified for each row in the grid that contains the sequence name ‘Hyper-V_Sequence1′ will be executed in the order that we specified, which now appears in the ‘Advanced Multi-Row Queue’ column. In this instance that means all of the VM guests will download and install updates. When they are all finished, the VM host will then download and install updates plus reboot.
    2015-03-23 16_30_08-new 1 - BatchPatch X9

Remotely Install Multiple .MSU Files (or .MSI and .MSP files) to Numerous Computers

$
0
0

In the latest version of BatchPatch (April 2015) we added a macro to automatically configure a deployment of multiple .MSU files (.MSI and .MSP also allowed). Deploying and then remotely installing an entire folder’s worth of patches / updates to numerous computers has never been easier. Note, if you’re using a pre-April-2015 version of BatchPatch, you can still accomplish this task, but it requires an extra manual step. Please take a look at this tutorial for pre-April-2015 versions of BatchPatch: Remote Script Deployment – Install Multiple .msu Files In A Single Action On Remote Computers. However, if you’re using the April 2015 (or newer) version of BatchPatch, here’s how it works:

  1. Place all the .MSU files that you plan to install into a single folder. There should be nothing else in that folder. You can use this method to install .MSU, .MSP, or .MSI files, but since Microsoft seems to now have mostly standardized on .MSU files for individual Windows update packages, in this example we’re just using .MSU files.
  2. Once all of your installation package files are in a single folder, launch BatchPatch and highlight the hosts that you want to include in the deployment. Then select ‘Actions > Deploy software/patch/script > Create/modify deployment.’
    2015-03-31 16_49_32-Program Manager
  3. In the ‘Deployment’ window that appears, click the folder browser button.
    2015-04-02 13_32_39-Deploy .msi .msp .msu .exe .reg .vbs .bat .cmd .ps1 etc
  4. Select the ‘Multiple update file deployment’ radio button, and then click OK.
    2015-04-02 13_36_15-Deploy .msi .msp .msu .exe .reg .vbs .bat .cmd .ps1 etc
  5. A message box pops up explaining to place all .msi, .msp, and .msu files to be deployed into a single folder. Click OK and then select the folder.
    2015-04-02 13_44_41-Deploy .msi .msp .msu .exe .reg .vbs .bat .cmd .ps1 etc
  6. After we select the folder, BatchPatch scans the folder for .msi, .msp, and .msu files. BatchPatch then creates a .cmd script file in the folder. The .cmd file contains the commands that will be used during execution to install the .msu files.
    2015-04-02 13_45_19-Deploy .msi .msp .msu .exe .reg .vbs .bat .cmd .ps1 etc
    2015-03-31 16_55_19-DeployMultipleFiles_Tutorial
  7. When we click OK on the final message box, BatchPatch automatically inserts the correct/appropriate deployment configuration options into the ‘Deployment’ form. The configuration is setup so that when you execute the deployment, the .cmd file that BatchPatch created along with the entire folder of .msu files will be copied to the target computers. Once copied to the target computers, BatchPatch will execute the .cmd script, which will handle installing each .msu file, sequentially.
    2015-04-02 13_46_05-Deploy .msi .msp .msu .exe .reg .vbs .bat .cmd .ps1 etc
  8. That’s all there is to it. You can now save and/or execute the deployment!

Importing Hosts and Other Information into a BatchPatch Grid

$
0
0

In the April 2015 release of BatchPatch we updated the method responsible for importing computers so that you can now import other items in addition to computer names and IP addresses.

The allowed values are:

1
# MAC       | NOTES	      || NOTES2       ||| DESCRIPTION       |||| LOCATION        |U| USERNAME        |P| PASSWORD        |D| DOMAIN

As long as you preserve the overall order of items listed above, you can enter as few or as many of them as you want when you import host names. It doesn’t matter whether you’re importing host names by using the “File > Add hosts” option or if you have a text file that you’re simply dragging and dropping on to the grid. The format rules will apply in either case. Below are some common examples of how one might choose to enter host names or IP addresses into the grid with additional information.

For example, if you only want to enter host names into a grid, the required format is as follows:

1
2
3
4
5
host1
host2
host3
host4
host5

However, if you want to add host names with MAC addresses, use the following syntax:

1
2
3
4
5
host1#CCDDEECCDDEE
host2#DDEECCDDEECC
host3#EECCDDEECCDD
host4#CCDDCCDDEEEE
host5#CCDDEEEECCDD

If you want to add host names, MAC addresses, and location information, use the following syntax:

1
2
3
4
5
host1#CCDDEECCDDEE||||3rd Floor Office
host2#DDEECCDDEECC||||Server room
host3#EECCDDEECCDD||||Data center
host4#CCDDCCDDEEEE||||4th Floor Office
host5#CCDDEEEECCDD||||4th Floor Office

If you want to add host names, MAC addresses, usernames, and passwords, use the following syntax:

1
2
3
4
5
host1#CCDDEECCDDEE||||3rd Floor Office|U|username|P|password
host2#DDEECCDDEECC||||Server room|U|username|P|password
host3#EECCDDEECCDD||||Data center|U|username|P|password
host4#CCDDCCDDEEEE||||4th Floor Office|U|username|P|password
host5#CCDDEEEECCDD||||4th Floor Office|U|username|P|password

If you want to add host names, MAC addresses, special notes, descriptions, usernames, and passwords, use the following syntax:

1
2
3
4
5
host1#CCDDEECCDDEE|Don't Reboot Unless host 23 is powered off|||host1 is responsible for video monitoring||||3rd Floor Office|U|username|P|password
host2#DDEECCDDEECC|Don't Reboot Unless host 24 is powered off|||host2 is responsible for intranet website monitoring||||Server room|U|username|P|password
host3#EECCDDEECCDD||||Data center|U|username|P|password
host4#CCDDCCDDEEEE||||4th Floor Office|U|username|P|password
host5#CCDDEEEECCDD||||4th Floor Office|U|username|P|password

If you want to add host names and notes, use the following syntax:

1
2
3
4
5
host1|special notes for host1
host2|special notes for host2
host3|special notes for host3
host4|special notes for host4
host5|special notes for host5

Using BatchPatch to Deploy Adobe Flash to Numerous Computers

$
0
0

I thought I’d spend a few minutes today to demonstrate how to install the Adobe Flash plugin to numerous computers, simultaneously, in just a few clicks.

  1. Obtain the installation media. In this example we’re going to use the .msi installer file that Adobe makes available. I recently tried to use the .exe that they publish, but at least at the time of this writing it doesn’t seem to support a quiet/silent command line installation, despite their documentation saying that it does. Adobe has a specific distribution license agreement that you are likely required to agree to before you may distribute Adobe Flash in your environment. The following link has more information about that, and of course it’s your responsibility to make sure you are properly licensed before proceeding with a deployment: Adobe Flash Player Distribution.
  2. Once you have obtained the .msi installer file, the process for deploying it to your computers is very straightforward. Add your hosts to the BatchPatch grid, highlight them, and then select Actions > Deploy software/patch/script/regkey etc > Create/modify deployment
    2015-04-23 15_59_12-Program Manager
  3. In the deployment window, click on the […] browse button to browse for the .msi file that you obtained from Adobe. You’ll be prompted to select a Normal (singular) deployment or a Multiple update file deployment. Choose the ‘Normal (singular)’ option, and then browse to the location of your ‘install_flash_player_17_plugin.msi’ file.
    2015-04-23 16_01_51-Deploy .msi .msp .msu .exe .reg .vbs .bat .cmd .ps1 etc
  4. You’re now ready to execute the deployment. Your deployment window should look something like mine does in the screenshot below. You can simply click “Execute now” to deploy the .msi file to all the highlighted computers in your grid. You may optionally first save the deployment by clicking the >> button. This would enable you to easily execute the deployment at a later date/time, if you so desired.
    2015-04-23 16_06_33-Deploy .msi .msp .msu .exe .reg .vbs .bat .cmd .ps1 etc
  5. When execution of the deployment is complete you should see Deployment: Exit Code: 0 appear in the All Messages column. That’s all there is to it! Pretty simple, right?
    2015-04-23 16_11_24-new 1 - BatchPatch X1

Advanced Script Integration with BatchPatch

$
0
0

In BatchPatch we’ve tried to integrate numerous features to help an administrator perform his/her duties. However, no matter how much we provide out-of-the-box, there will always be unique situations in every environment, and it might be the case that you want BatchPatch to do something that it doesn’t already do. Of course in these instances you are welcomed to send us an email describing what you’d like to see added to the software. But if you’re looking to accomplish something non-standard that’s not currently available on the BatchPatch menu, it’s very possible that this can already be done using BatchPatch, if you’re willing to do a bit of scripting.

For example, let’s say that you want to use BatchPatch to install Windows Updates and reboot a group of computers, but you want to ensure that the process does not begin until each computer is no longer running a certain process or processes. You’d like to be able to tell BatchPatch to update and reboot your computers as soon as a certain set of processes is no longer running. How could you accomplish this task? One way to do it would be to write a simple script that runs indefinitely in a loop, checking for the existence of specific running processes. If the processes are found to be running on the system, then the script sleeps for a minute before checking again. This goes on indefinitely until the script does not detect the specified processes, at which point it exits. Using a simple script like this, you could integrate it into a BatchPatch job queue, such that as soon as the script ends, your Windows Update and reboot process begins. Here’s how it can be done:

Sample script:

Download ProcessComparison.vbs

1
2
3
4
5
6
7
8
9
10
11
12
13
14
15
16
17
18
19
20
21
22
23
24
25
26
27
28
29
30
31
32
33
34
35
36
37
38
39
40
41
42
43
44
45
'Gets the list of running processes on a computer.  If a running process matches a pre-defined list of executables, the script sleeps for a minute and then checks again.  If there is no match, the script exits.  Cocobolo Software LLC April 2015.
'usage: cscript.exe ProcessComparison.vbs COMPUTERNAME

'the first argument from the command line is assigned to strComputer
strComputer = WScript.Arguments(0)
 
'create an array containing the list of process names that we want to ensure are no longer running
publishedAppsArray = Array("MyProcess1.exe","MyProcess2.exe","MyProcess3.exe")
 
Do
 
	strRunningProcessesList = ""
	boolAreUsersLoggedOn = 0
 
	on error resume next
	Err.Clear
 
	Set objWMIService = GetObject("winmgmts:\\" & strComputer & "\root\cimv2")
 
	'Get list of running processes
	Set colProcess = objWMIService.ExecQuery("Select * from Win32_Process")
			For Each objProcess in colProcess
				strRunningProcessesList = strRunningProcessesList & " " & objProcess.Name
			Next
 
	'loop through our list of exes to see if there is a running process on the computer that matches an entry in the list 
	For Each strPublishedProcessName in publishedAppsArray
 
		'this If statement will return 0 if the strPublishedProcessName is NOT found in strRunningProcessesList
		If InStr(LCase(strRunningProcessesList),LCase(strPublishedProcessName)) = 0 Then
			boolAreUsersLoggedOn = 0
		Else
			boolAreUsersLoggedOn = 1
		End If
	Next 	
 
	'If there are no published apps running then the Do loop is exited and the script subsequently exits, else the script waits a minute before looping and checking again
	If boolAreUsersLoggedOn = 0 Then
		Exit Do
	End If
 
	'sleep 60 seconds
	WScript.Sleep 60000
 
Loop

Using ‘Local process/command’ vs ‘Remote process/command’

BatchPatch is capable of executing scripts locally on the same computer that runs BatchPatch.exe, or remotely on target hosts. In some situations it might be easier or make more sense to use one option over the other. In this particular case, in the vbscript posted above, we are actually able to pass a computer name into the script as an argument. This script is able to operate on remote computers without having to run directly on the actual remote computers, so in this case we are able to execute it using ‘Local process/command’ in BatchPatch. However, if the script didn’t have the ability to query remote computers and was instead written to operate on the computer that was executing it, then we would instead use ‘Remote process/command’ in BatchPatch to perform the execution.

Remember…

  • If a script has built-in capability to query remote computers, then the script should be run on the local computer that runs BatchPatch using Actions > Local process/command.
  • If the script does NOT have built-in capability to query remote computers and it can ONLY retrieve information about the local computer that it’s being executed on, then the script must be executed remotely on each target computer using Actions > Remote process/command.

To integrate the ProcessComparison.vbs script into a Job Queue using BatchPatch:

  1. First we need to create the ‘Local process/command’ that we’ll use later in the Job Queue. Select Actions > Execute local process/command > Create/modify local commands.
    2015-04-27 16_15_11-Program Manager
  2. In ‘Local Process’ window we’ll add the command to execute our script.
    2015-04-27 16_24_17-Program Manager We’re able to use $computer as a parameter, which will tell BatchPatch to send the host name from the row that executes the script. This is the key to how we use a local script to accomplish a task on a remote computer.
  3. Next we’ll create the Job Queue that utilizes the script. The goal with this job queue is to only download and install Windows Updates on target computers *after* the script exits, which will indicate that none of the pre-defined processes that we hard-coded into the script are running on the target computers when the Windows Update action is triggered. Select Actions > Job Queue > Create/modify job queue.
    2015-04-27 16_53_21-Program Manager
  4. In the Job Queue window, locate the ‘Local Command’ you just created, and then insert it into the queue before the ‘Download and install updates + reboot if required’ action. Then save the queue by clicking the >> button.
    2015-04-27 16_55_24-Job Queue
  5. Finally we’re ready to execute the queue. Select Actions > Job Queue > Execute saved job queues > Wait for pre-defined processes to end…
    2015-04-27 16_59_01-
    BatchPatch will now wait until a target computer no longer has the running processes specified in our script. Then it will execute the Windows Update + reboot if required. That’s all there is to it!

Using Alternate Logon Credentials in BatchPatch

$
0
0

You have a few different options for initiating actions on target computers with the account that you have set aside for administrative actions. Most actions in BatchPatch must be executed with an account that has local administrator permissions on the target computer. However, in some cases a BatchPatch administrator might not be logged on to the BatchPatch computer with the same account that has been granted local administrator privileges on the target computers. Below are the different methods available to the administrator.

3 methods for specifying credentials:

  • (Recommended) Logon to the BatchPatch computer with the same account that has been granted local administrator permission on the target computers. This is the recommended method for operating BatchPatch. Whenever possible, we encourage you to simply log on to the computer that runs BatchPatch with the same account that you have designated to exist in the local administrators group on the target computers.
  • Launch BatchPatch using “run-as,” by right-clicking on the BatchPatch.exe and choosing “run-as” so that you may enter different credentials for launching the application. In this case you might be logged on to your computer with one account, but you are then able to launch and run BatchPatch under a different account, with that different account also being a member of the local administrators group on the target computers.
  • Launch BatchPatch normally, but input row-specific credentials for each host in the BatchPatch grid. With this option you are able to specify a different logon account to use for each target host listed in the BatchPatch grid. If your target hosts are setup such that you must use a different logon account to obtain administrative privileges on each of the target computers, then this method is your best bet.

Domain environments:

In typical domain environments, there isn’t much else that you have to be aware of when it comes to logon accounts. As long as the logon account that you are using to run BatchPatch (or the logon account that you have specified per-row in the ‘alternate credentials’ dialog) is in the local administrators group on the target computers, you should be ok when it comes to permissions and authentication.

Non-domain (workgroup) environments:

In workgroup / non-domain environments, there are a couple of extra items that you need to be aware of in order to get authentication working properly with BatchPatch.

In non-domain environments you will be launching BatchPatch under the security context of a local account instead of a domain account OR you will be specifying alternate credentials in each row of the BatchPatch grid. In order for these methods to work, the local account that you’re using to launch BatchPatch or the local account that you are specifying in each row of the BatchPatch grid must also exist on the target computers, defined with the exact same username and password that is defined on the computer running BatchPatch. This user account must also be a member of the local administrators group on the target computers.

Once you’ve got your accounts all setup on the target computers with the same username and password that is used for the account on the computer that is running BatchPatch, and you’ve made sure that each target computer’s local administrators group contains the local account that you just created on each target computer, there is still one more element to configure.

  • If the local account you are using to run BatchPatch is THE built-in administrator account on the target computers, the following registry DWORD must be set to 0 on the target computers. When this DWORD is set to 0, the built-in administrator account is set to full-token mode, and BatchPatch will work properly. However, if it’s set to 1, the built-in administrator account is put in admin-approval mode, which will prevent most BatchPatch actions from completing successfully for those target computers:

    (Only required for Vista/7/8/2008/2008R2/2012/2012R2. NOT required for XP/2003):
    HKLM\SOFTWARE\Microsoft\Windows\CurrentVersion\Policies\system\FilterAdministratorToken
  • If the local account you are using to run BatchPatch is not THE built-in administrator account on the target computers, but instead is just a regular named local account that is a member of the local administrators group on the target computers, then the following registry DWORD must be set to 1 on the target computers:

    (Only required for Vista/7/8/2008/2008R2/2012/2012R2. NOT required for XP/2003):
    HKLM\SOFTWARE\Microsoft\Windows\CurrentVersion\Policies\system\LocalAccountTokenFilterPolicy
Viewing all 261 articles
Browse latest View live